Setting Up Your Google Analytics Account
To walk you through setting up your Google Analytics account.
Prefer a shortcut? 16 free tools do parts of this for you.

Aim: To walk you through setting up your Google Analytics account.
Optimal Outcome: To maximize the utilization of Google Analytics depending on your business’ objectives, which includes tracking and monitoring of website traffic, customer engagement, and determining valuable visitors.
What do you need to start: To follow this SOP, you need to have a Google account which you can incorporate in creating and setting up your Google Analytics account.
Why is this SOP Important: Setting up a Google Analytics account is necessary for your business to analyze the customer information that the digital tool has generated using page tags. Google Analytics is a helpful SEO and marketing tool which is powered by Google, which is a prominent search engine. You can determine visitors which are suitable for the products or services that you offer in the market.
When and Where to execute: To execute this SOP, you must prepare your business information and a Google account to dedicate to your business, which can be related to the email address.
Who Should Be Doing This: This should be done by the SEO or marketing specialist. Assistance from the web developer would also be preferred.
Google Analytics Setup
Most firms that operate online use Google analytics, which is a currently helpful tool in the digital market. Using this set of resources, which is provided by Google, enables you to learn more about the activities of your business from the people who visit your website.
Utilizing this is advantageous for tracking product performance, brand recognition, and marketing strategies. Google Analytics is another source of user information that may be obtained and used to deliver outcomes.
Execution
Resources/Tools & Set up
- Google Account
Setting Up Google Analytics Account
- First, go to Google Analytics and sign in your Google account that you use for your business.
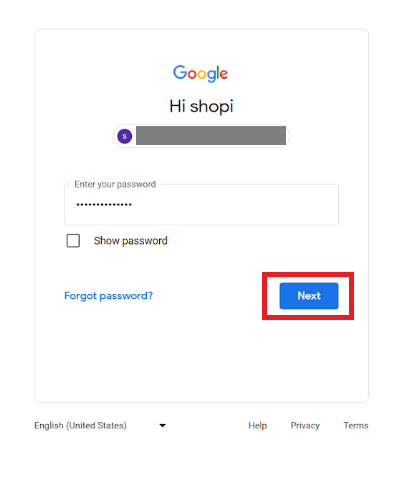
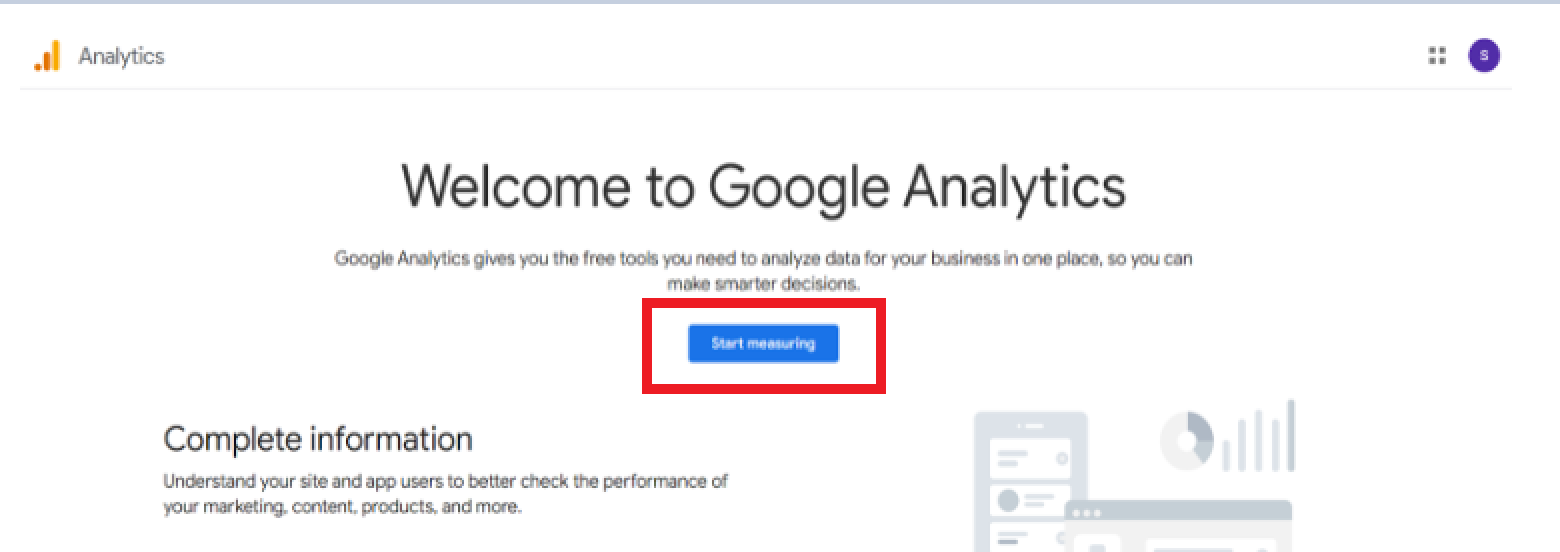
- After signing into your Google account, you will be redirected to the official webpage for Google Analytics. Click the “Start measuring” button to start the process of creating and setting up your Google Analytics account.
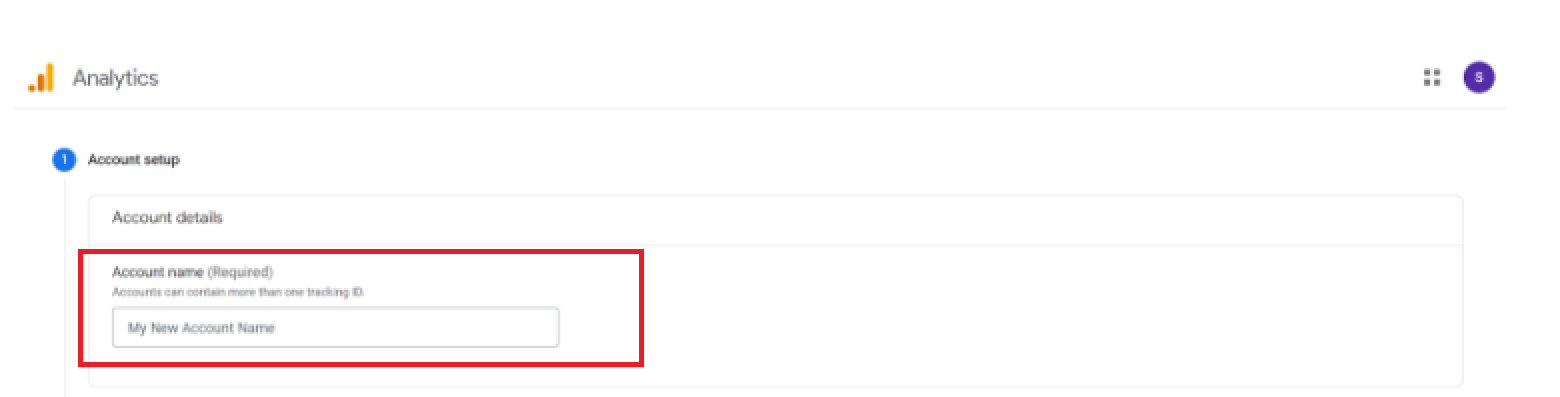
- You will then be redirected to the Account setup after you clicked the button. In this tab, you will be asked to indicate information on your Account details and Account Data Sharing Settings.
- This is followed by the Google Analytics Terms of Service which you should review to ensure the safety of your business account in Google Analytics.
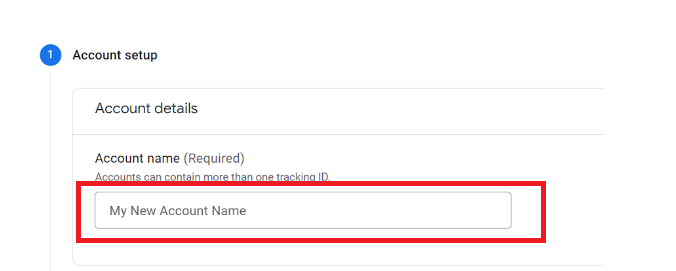
- In the first part of the Account setup, account details such as the Account name is required. In the blank field, you can indicate an account name which will reflect in your Google Analytics account. You can simply put your business name on the blank field indicated.
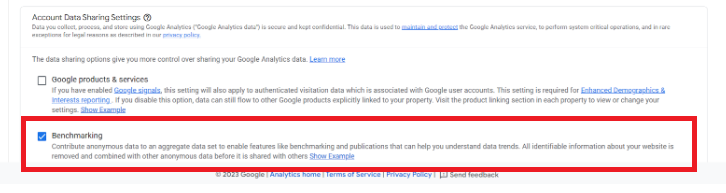
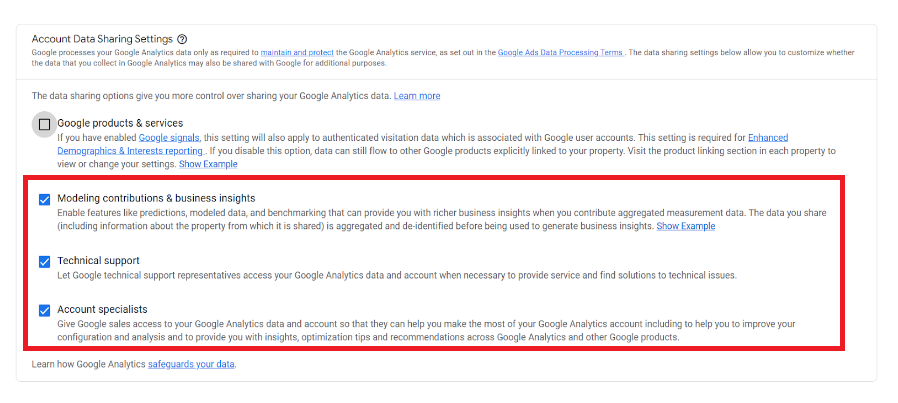
- Next is the Account Data Sharing Settings. This part includes four data sharing customizations for Google Analytics which you will allow for Google to have control over. These data sharing settings are the following:
-
Google products and services
-
Modeling contributions and business insights
-
Technical support
-
Account specialists
To give Google access to this information, check the corresponding checkbox beside the option that you want to approve of.
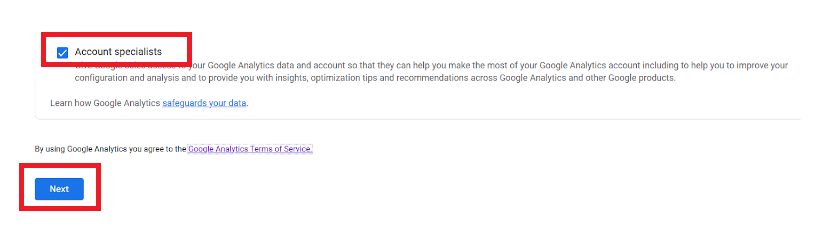
- In the last part of Account setup, you will be able to read and clarify Google Analytics Terms of Service by clicking it. After reading the terms, you can click “Next” to proceed with the next step in setting up your Google Analytics account.
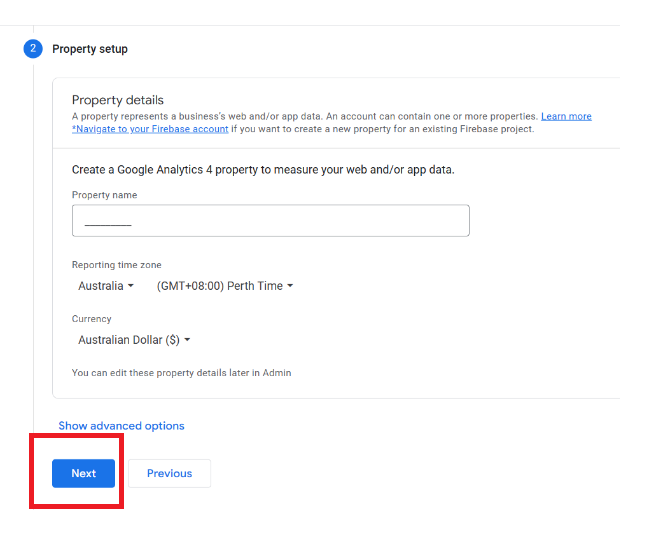
- After Account setup, the next part of setting up an account in Google Analytics is the Property setup. This part mainly inquires about your business’ property details. These details include the Property name, Reporting time zone, and currency. The property name can be the name of your business website or the application that you have created.
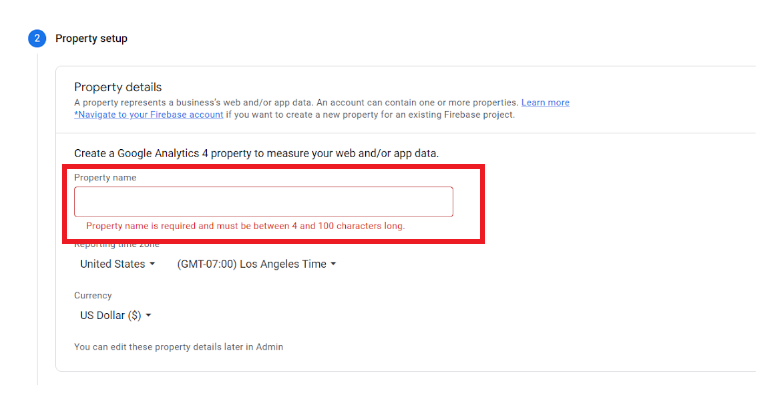
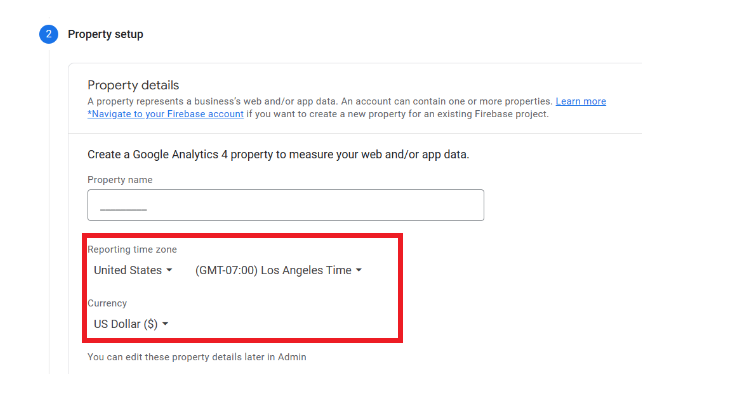
- The reporting time zone is the time zone wherein every visit and interaction with visitors were recorded. It will be the time zone in the country where your business is operating, so despite differences in your time zone and your customers’ time zone, it will be reported as the reflected time in your country. To edit the country and time zone, click the dropdown menu beside the country.
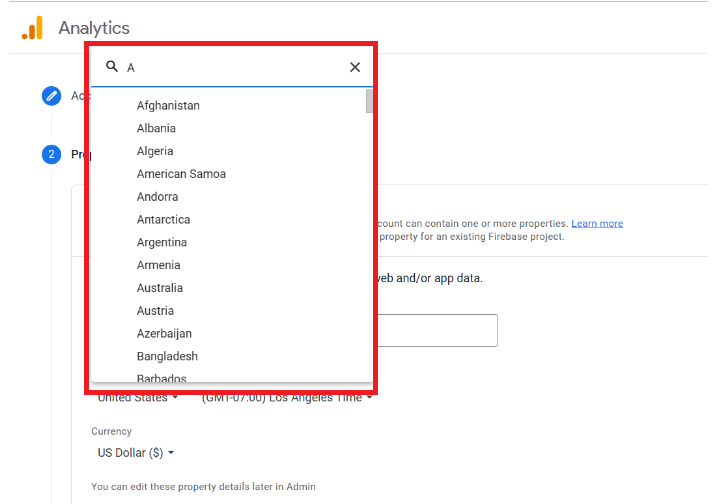
- To search for your country, click the search box above and type your country then click it.
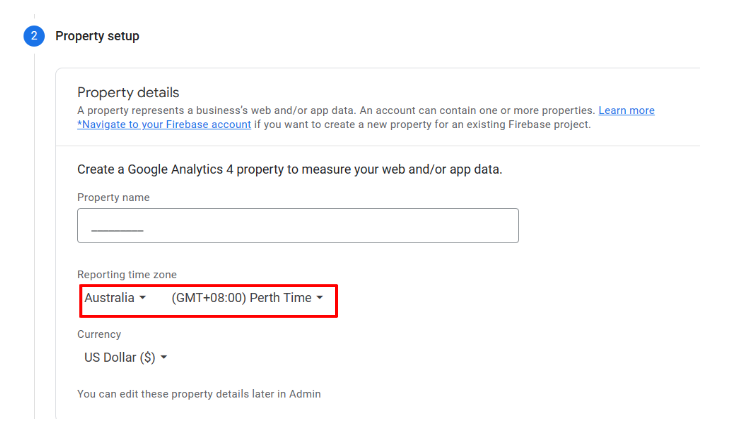
- After clicking your country, it should also reflect the time zone for that country which is generated by Google.
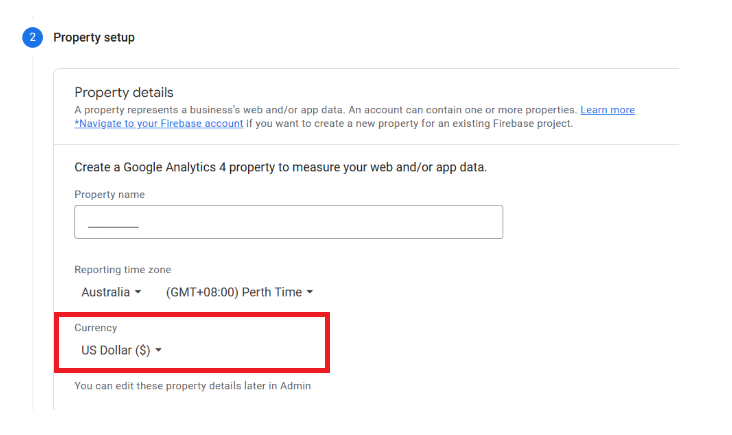
- Lastly, the currency can be changed depending on your preferred currency. If you are doing international business, then it would most probably be in US Dollar ($). But if you want to select the currency in your country, you can click the dropdown menu beside the currency to search and choose the currency.
- To search for your country’s currency, click the search box above and type your currency then click it.
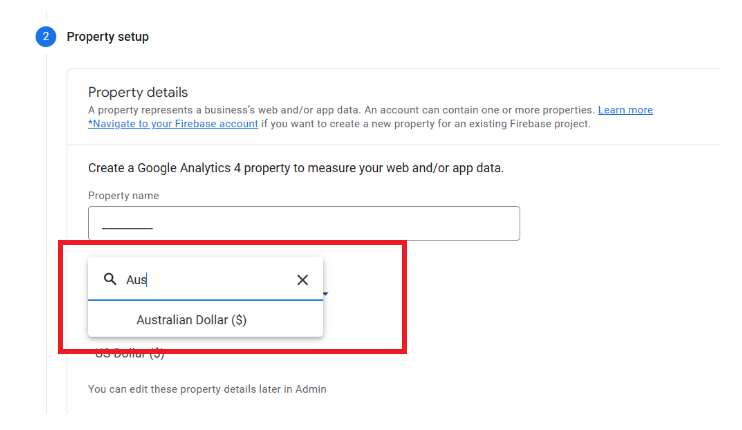
- After clicking the currency, your Property setup is finished and you can proceed with the next step by clicking “Next”.
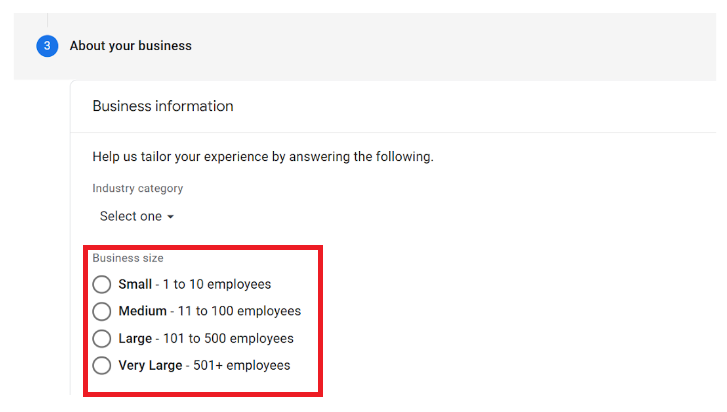
- After Property setup, you will now proceed to Business information. Here, you will indicate necessary information about your business which can contribute to your Google Analytics data. First, you will be asked to identify your Industry category. To identify it, click the dropdown menu “Select one”.
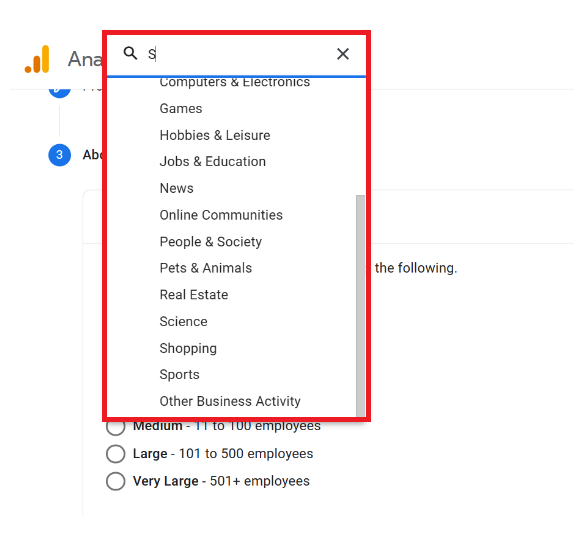
- To search for your business’ industry, click the search box above and type your industry then click it. If your industry is nowhere near the given options, you can opt to choose “Other Business Activity”.
- Next is the Business size. This information determines the number of employees that are currently working in your company. You can choose between Small, Medium, Large, or Very Large business sizes by clicking the circle beside the appropriate option for your business. Take note that you can only choose one in this portion.
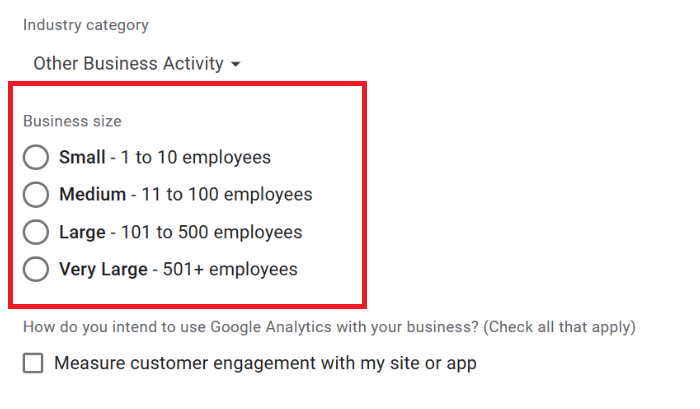
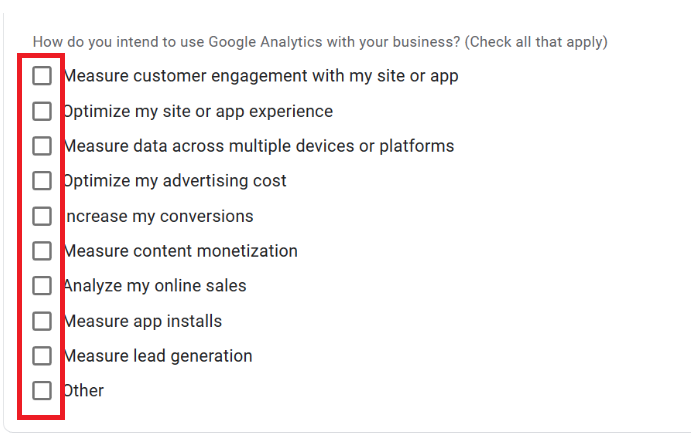
- Lastly, you can choose the objectives that apply to your business that you can monitor using Google Analytics. There are 10 options given, and you can select all. To select an objective, check the checkbox beside the certain business goal.
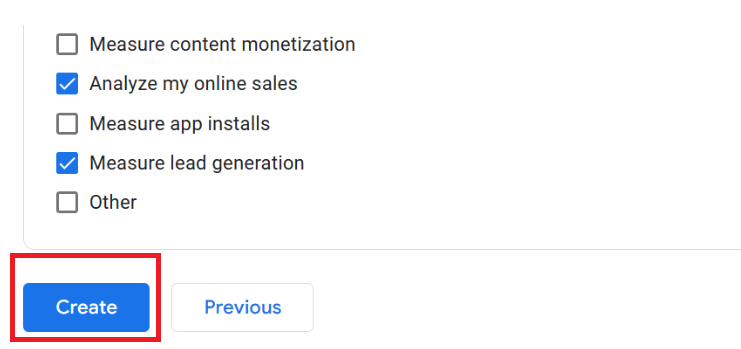
- After selecting your preferred actions, you can now create your Google Analytics account by clicking the “Create” button.
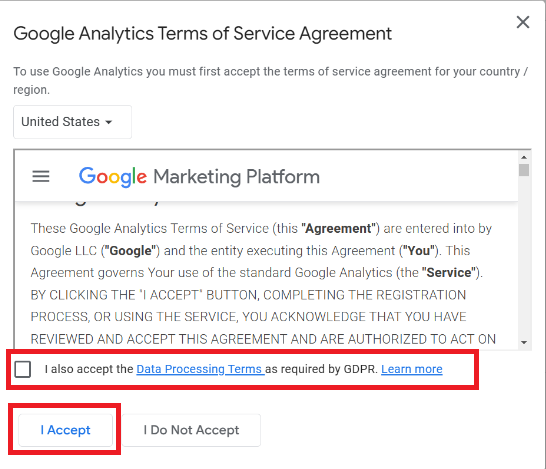
- A pop up tab will open after clicking Create. You must read and analyze the Google Analytics Terms of Service Agreement and Data Processing Terms before proceeding to the creation of your account. Click “I also accept the Data Processing Terms as required by GDPR” after reading it. Lastly, click “I accept” if you are fine with the agreement by Google Analytics.
Additional Setup
- After creating the account, you will be asked whether the property that you manage is a Website, Android application, or iOS Application. Click the appropriate platform for your property by clicking it.
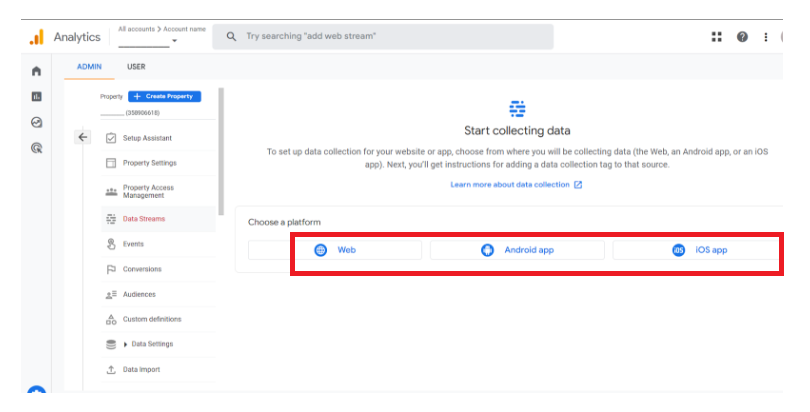
- After this, you will be redirected to the tab where you can set up your data stream for your website. You will be asked to type your Website URL on the blank field provided under Website URL. On its right side, you can put the name of your website in the blank field provided under Stream name.
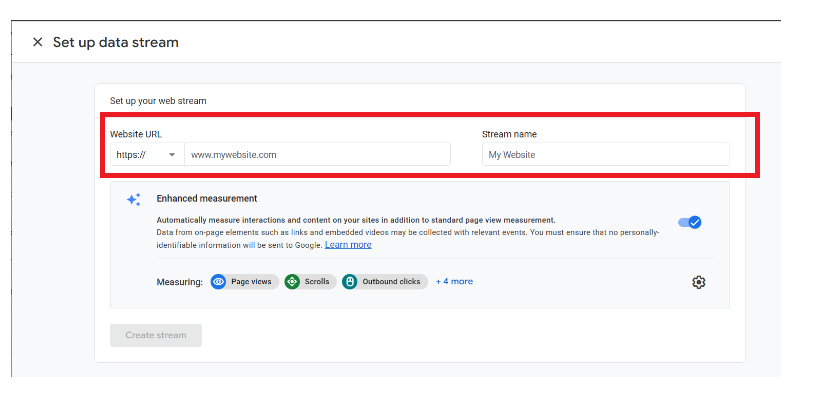
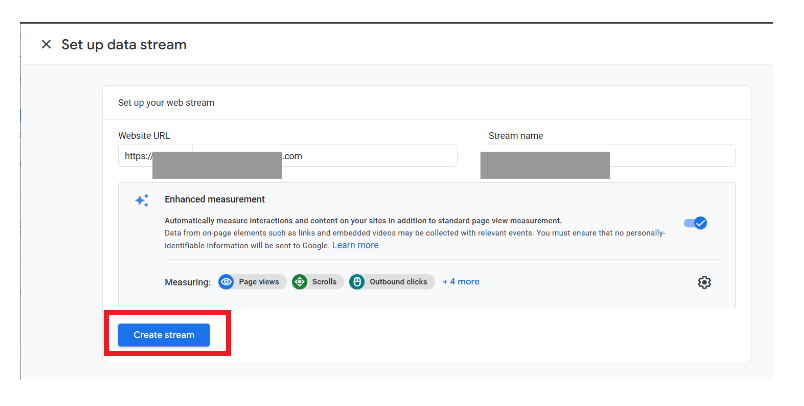
- After indicating your Website URL and Stream name, you can now click “Create stream” for the property.
- You will then be redirected to the Web stream details tab. In this tab, you will see your Website URL, Stream Name, and also your Measurement ID. This can be used to send data to your property through an associated web data stream.
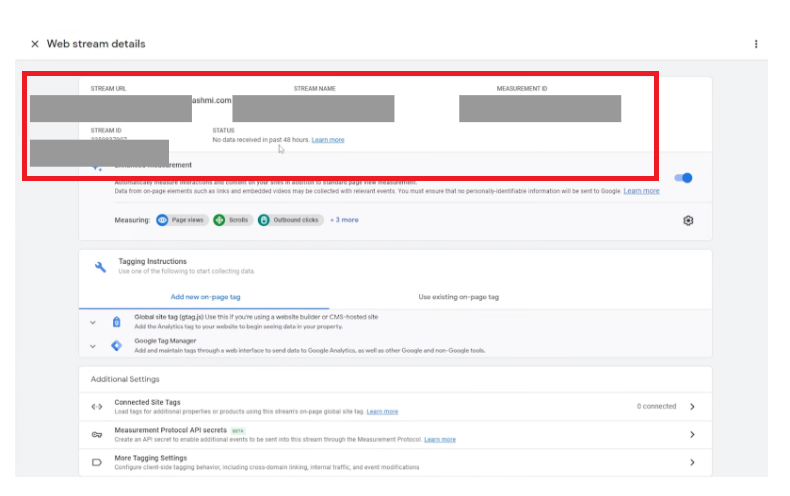
- In the web stream details, you can see the Tagging Instructions and Additional Settings which will be beneficial to your business website. In the Tagging Instructions, you can choose one from the two tagging settings for your website. Click the “Add new on-page tag” to start from scratch.
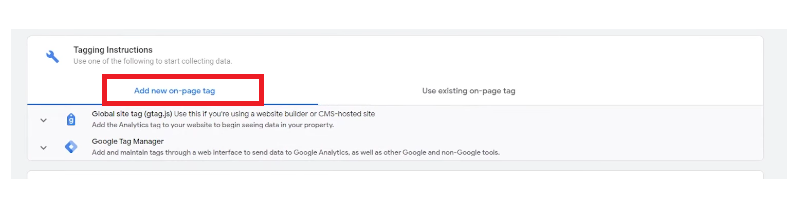
-
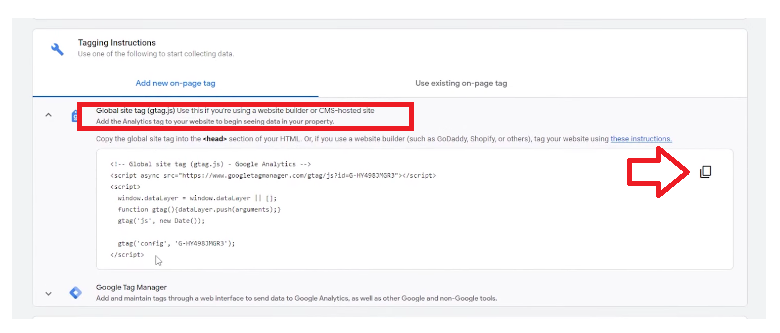
Click the “Global site tag” dropdown menu to begin seeing data in your indicated property or website.
-
Click the Copy icon on the upper right side of the coding link to copy it. This will be used to monitor data on visitors coming from your website by pasting the code link in the back end of your website, that’s why you can use some help from your website developers. You can apply this on your website, or from other website builders such as Shopify.
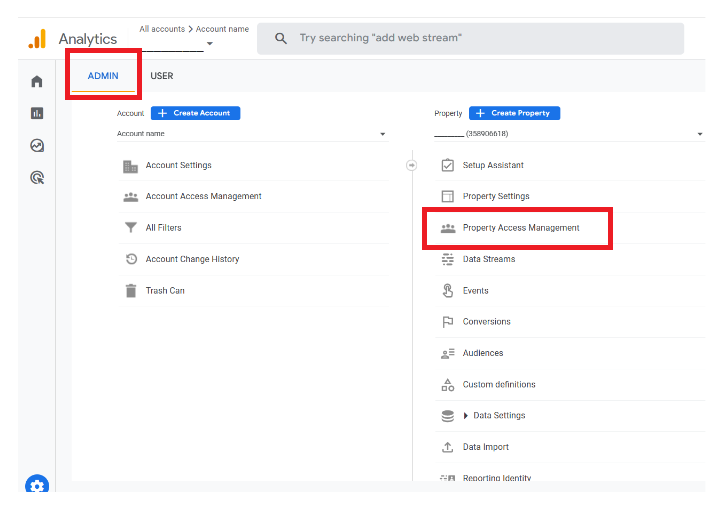
- You can also add new users and user groups in your Google Analytics account property so they can monitor the progress of your website. To do this, click Admin > Property Access Management.
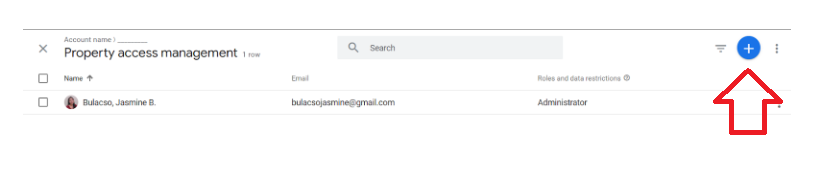
- To add new user or user groups, click the Add button on the upper right corner.
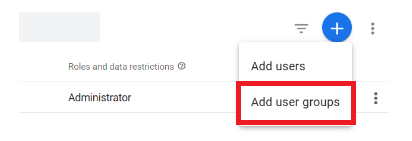
- To add user groups, click “Add user groups”.
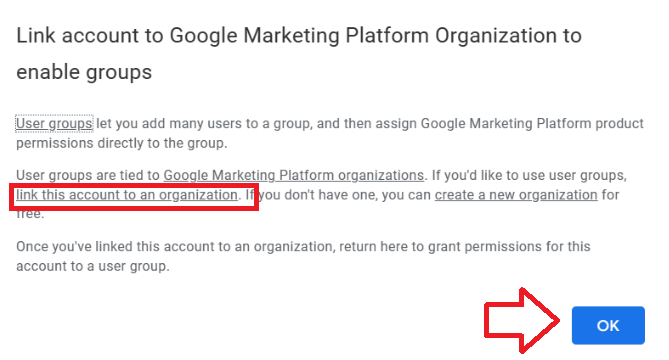
- To proceed with adding new user groups, you must first link the Google Analytics account to Google Marketing Platform Organization because User groups are tied to those organizations. You can create a new organization for free.
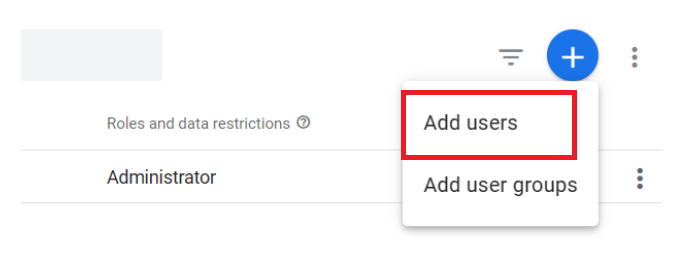
- To add new users, click “Add users”.
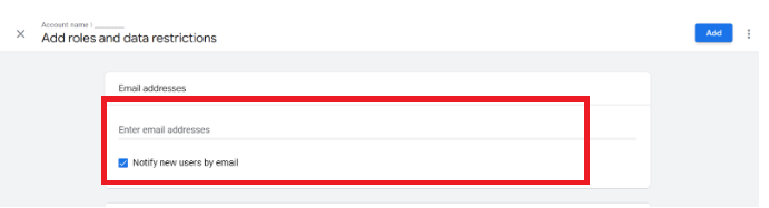
- To add persons, you can only add them by providing their email addresses on the blank field provided. To notify them, check the box beside “Notify new users by email”.
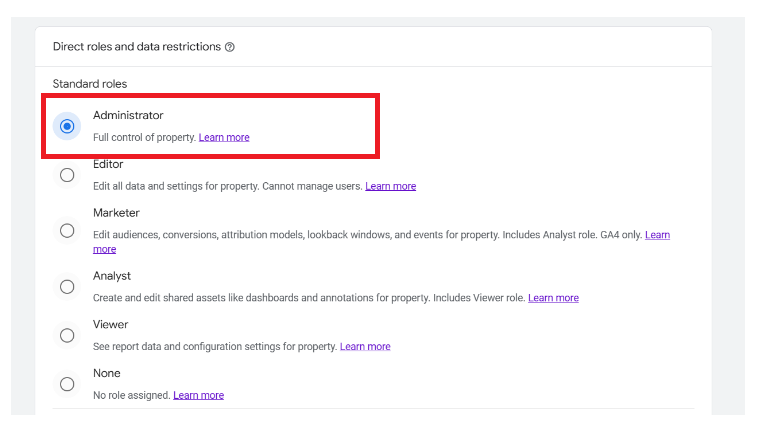
- To assign direct roles, scroll down to Direct roles and data restrictions. You can choose whether you want the new users to be administrator, editor, marketer, analyst, viewer, or if you want to assign none. If you are aiming for full monitoring of the property, you can assign them as administrators for easy access to the data. Click the circle beside the role to select it.
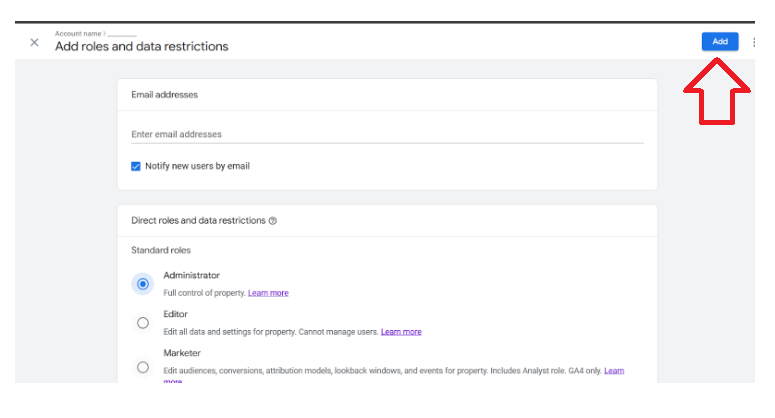
- After finalizing the direct role, click the “Add” button on the upper right corner to notify and give permissions to new users.
Conclusion
You’re done! Remember that Google Analytics is an important tool for your business especially if you want to monitor the website traffic and customer engagement to oversee the progress of your business.
-
Google Analytics works for websites by creating a tag or code link to insert to a website’s backend coding to monitor the website visitors and other functions.
-
To create a Google Analytics account, you need to have a Google email address dedicated to your business to link the Google Analytics account.
-
There are three parts to finish before you can create your account, the Account setup, Property setup, and Business information.
-
Copying the tag will only be enabled once you create a data stream for your website or other property such as Android and iOS apps.
-
You can also add new user and user groups for your Google Analytics account so that other people in your business can manage and monitor it.
-
After indicating your tag in the back end code, you can monitor the activities of your viewers in Google Analytics to see whether they responded or not to current inputs. If not, then you can always find a way to improve your website to attract new visitors.