Creating Conversion Goals in Google Analytics
To set up goals in Google Analytics 4 in order to track the conversions in your website or online shop.
Prefer a shortcut? 16 free tools do parts of this for you.

Aim: To set up goals in Google Analytics 4 in order to track the conversions in your website or online shop.
Optimal Outcome: You will be able to determine the specific digital interactions that online visitors perform on your website or online shop that you consider as a conversion. These include form submissions, purchases, file downloads, and more.
What do you need to start: To follow this SOP, you will need to have a Google Analytics 4 account. This will also require a Google Tag Manager account.
Why is this SOP Important: Conversion is the lifeline of any e-commerce website. Thus, tracking conversions is crucial in optimizing your site to ultimately boost sales and overall performance.
Where to execute: You will need to set up a Google Analytics 4 account and a Google Tag Manager account before you can set up your conversion goals.
Who Should Be Doing This: The business owner, the marketing manager, the person who manages web analytics
What Is a Conversion Goal?
A conversion goal in Google Analytics 4 is any form of digital interaction by an online visitor that can count as a conversion.
While most websites and online shops tend to focus on making sales, purchases aren’t the only actions that can be counted as a conversion. Other conversion goals may include form submissions, file downloads, outbound clicks, video or audio plays, subscriptions, and more.
Execution
Resources/Tools & Set up
-
A Google Analytics 4 account
About This SOP
In this SOP, we’ll discuss the method od tracking five conversion types that covers majority of your necessities:
-
Lead Signup
-
Purchase
-
Button Click
-
Session Time
-
Pages / Session
This SOP also works by assuming your site has a Thank You page for some of your goals. Thank You pages typically prompts out when users accomplish specific conversion actions such as purchases or newsletter sign-ups.
Remember: This SOP will also show two different conversion tracking methods: one that uses Google Tag Manager and one that doesn’t use Google Tag Manager.
Using Google Tag Manager to Track Conversion Goals
There are two main steps involved in using Google Tag Manager to track conversion goals via Google Analytics 4. These are:
-
Setting up Google Analytics 4 Events Using Google Tag Manager
-
Configuring Google Analytics 4 Events as Conversion Goals
Setting up Google Analytics 4 Events Using Google Tag Manager
-
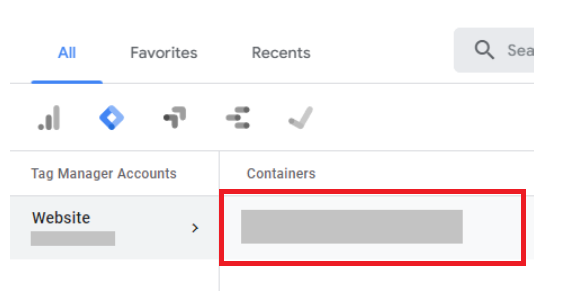
Log into Google Tag Manager. Select the website or online shop that you wish to configure.
-
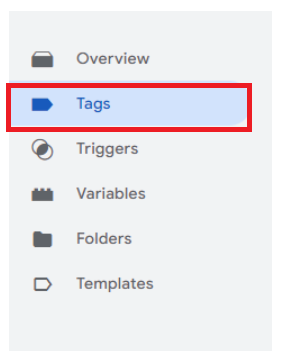
Click on Tags within the left sidebar, then select New. You will find the New button at the upper right-hand of the dashboard. A new side panel will appear.
-
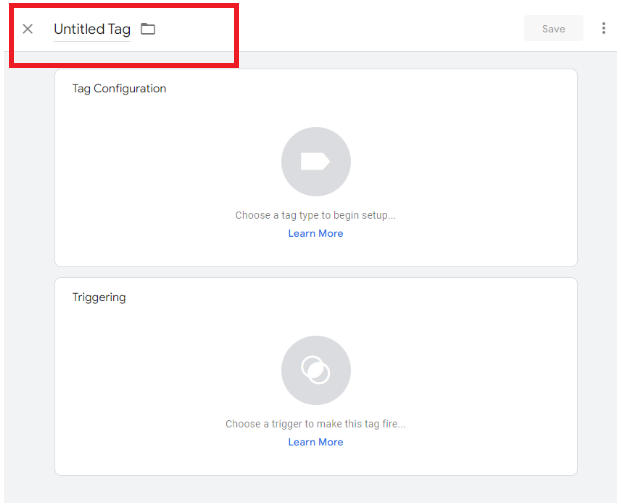
Assign a name to your tag. We recommend choosing a simple and memorable way of naming your tags. This can prevent confusion down the line. A specified naming convention will also keep things organized. For the purposes of this SOP, we are going to name this Tag as Event_LeadSignup.
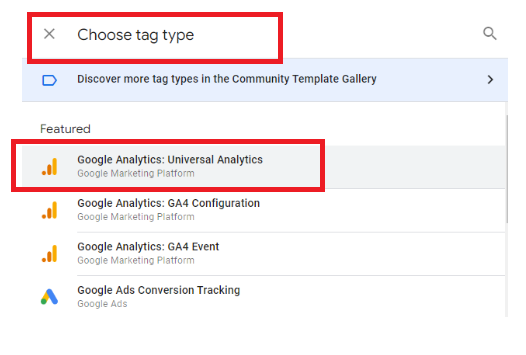
- Click on Choose a tag type to begin setup under the Tag Configuration section**.** The Choose tag type side panel will appear. Afterward, select Google Analytics: Universal Analytics from the dropdown list.
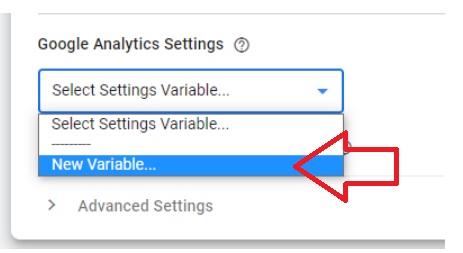
- New sections will appear. Go to Google Analytics Settings and click on Select Settings Variable… Click on New Variable…
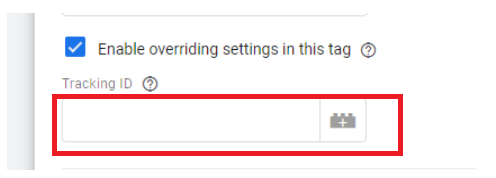
- This will reveal the Variable Configuration side panel. Enter your Tracking ID at the space provided.
-
Remember: If you don’t want to set your Google Analytics ID using a variable, click Enable overriding setting in this tag to allow you to directly enter your Google Analytics Tracking ID.
-
Also remember: You will find your Google Analytics ID on your Google Analytics Admin Settings page.
To do this, go to the main dashboard and click on the gear icon at the bottom left hand of the page.
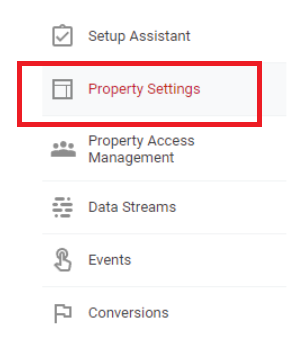
Next, click on Property Settings under the Property column.
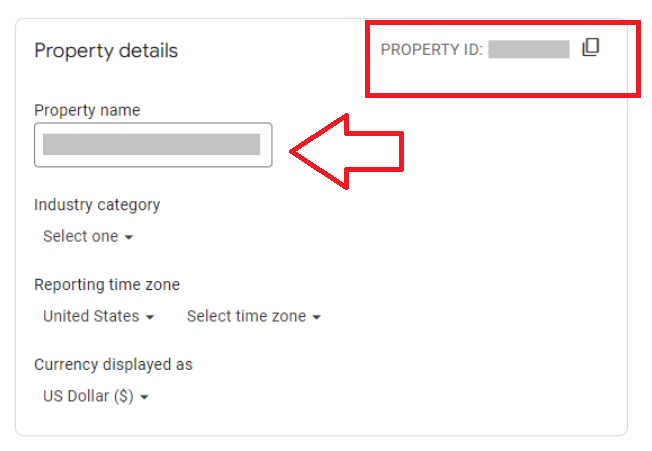
You will find your Property ID at the upper right hand of the dashboard in the Property details section.
- Under the Track Type dropdown panel, click Event.
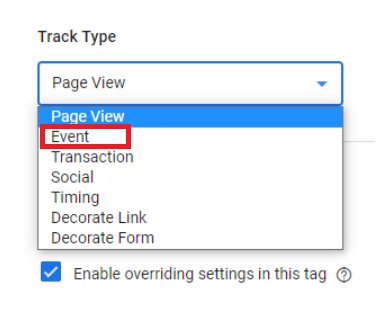
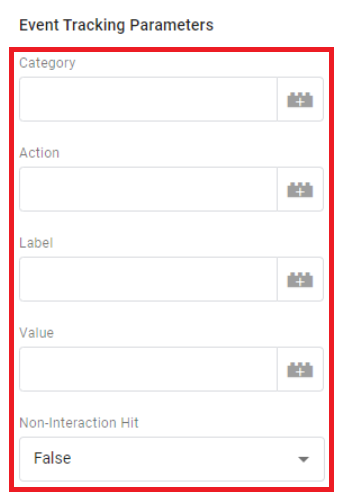
- The Event Tracking Parameters will appear. It will ask you to enter the Category, Action, Label, and Value of your event.
Remember: Event Tracking Parameters also seek to help you organize the hierarchy of your events. Hence, setting them up from the get-go can prove beneficial once you’re already analyzing your data.
-
Category: You can choose to group your categories by UI Elements, depending how the nature of your company and your account structuring process. In the example, we chose to name categories after different consumer journey stages/
-
Action: You can name this parameter after a specific action performed by a site visitor. For example, if your category is a sign-up form, you can choose “Submitted”, or “Declined”.
-
Label: This parameter may be named for the receiver of the action a site visitor performed. For example, if your action is “Submitted”, the label could be the name of the sign-up form.
-
Value: May be monetary or otherwise. It is most likely associated with the event you’re configuring.
-
Non-interaction hit: When site visitors do specific actions that triggers the condition for a prompt, will this visitor be considered non-bounce? If it’s yes, leave the field at False.
-
Remember: if unsure how to answer this, ask yourself:
-
“Will performing this action mean this page interests the visitor?”
-
If yes: set it as False.
- Ie. filling up a form
-
If no: set it as True.
- Ie. declining a prompt
-
-
-
Remember: Fields can be changed dynamically by variables as they occur. For example, you can use the Page URL variable or type {{Page URL}} in the Label field to set the Label to the URL of the page.
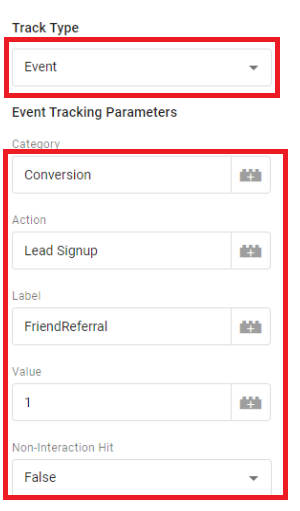
For the purposes of this SOP, we are going to use the following Event Tracking Parameters:
-
Category: Conversion
-
Action: Lead Signup
-
Label: FriendReferral
-
Value: 1
-
Non-Interaction Hit: False
- Once you’re done setting up your Event Tracking Parameters, you can now move on to determine the trigger to your event. This can be done by scrolling down to the Triggering section and clicking on Choose a trigger to make this tag fire…
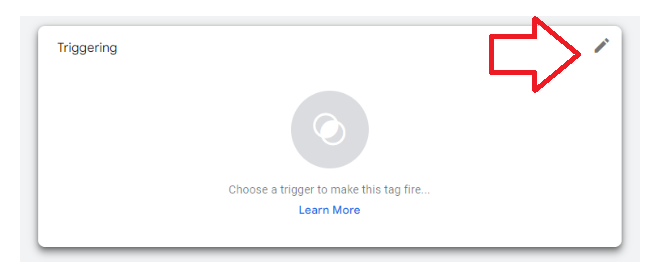
There are two ways to do so:
-
Through Page Views: choose this one if you have a Thank You page or if a specific site goal has been triggered by a site visitor’s action.
-
Through Clicks: choose this when a site’s goal is triggered when the site visitor clicks on a specific element.
- How to Set-up a Page View Event
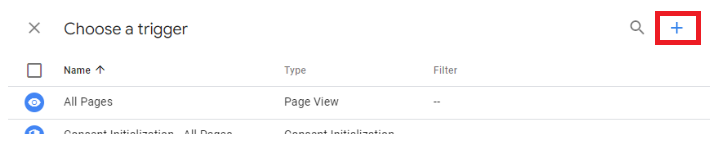
Click on the + sign at the upper right hand of the Choose a trigger panel.
-
The Trigger Configuration panel will appear.
-
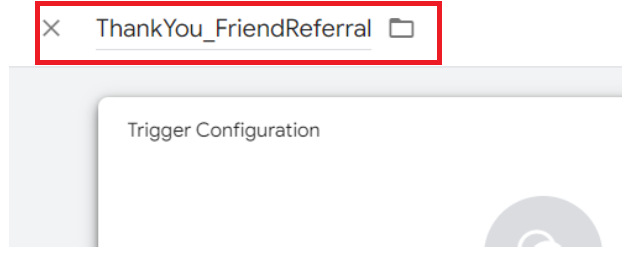
Name your trigger. For the purposes of this SOP, let’s say that you want to track how your Thank You page via Friend Referrals. As such, we are going to name it ThankYou_FriendReferral.
-
Click on Choose a trigger type to begin setup…
-
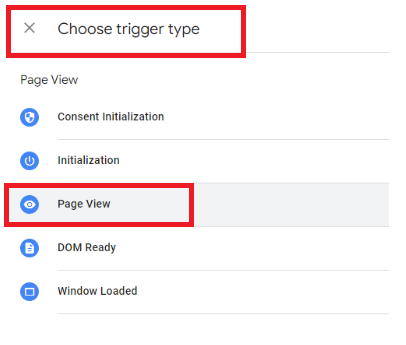
The Choose trigger type panel will appear. Then select Page View and tick Some Page Views.
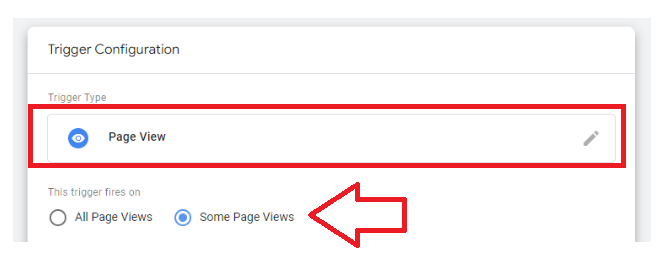
- The trigger firing rules will appear below. Instead of Page Hostname select Page URL. Then change contains with matches RegEx.


- Build a Regular Expression (RegEx) matching the URL where you want to execute your Goal.
Remember: If you’re already confident with how GTM works and think using RegEx conditions is a redundancy or requires heavy tweaking, you can skip this step. Otherwise, you can proceed with this procedure.
Important: The steps below allow you to create a RegEx that matches your URL even when:
-
It starts with https or http.
-
You use a trailing slash or otherwise
-
You’re adding parameters to your URL or otherwise
-
Your folder structure has deeper URLs or otherwise
-
Input the URL where you want to execute your conversion.
i.e. https://www.samplewebsite.com/thank-you-new-subscriber/
- Omit the https:// (or http://), the last trailing slash, and the www from the URL.
i.e. samplewebsite.com/thank-you-new-subscriber
- Add a reverse slash (\ before all dots and slashes.
i.e. samplewebsite\com\thank-you-new-subscriber
- Add the following code after the tweaked URL: (?!\.*\)((\?)$|.*.*=.*)
i.e. samplewebsite\com\thank-you-new-subscriber(?!\.*\)((\?)$|.*.*=.*)
- Add the following code to at the beginning of the tweaked URL: (http|https):\\(www\)?
i.e.(http|https):\\(www\)?samplewebsite\com\thank-you-new-subscriber(?!\.*\)((\?)$|.*.*=.*)
- Your RegEx expression is now complete.
h. Enter the correct RegEx code into the last field.

i. Then, click on the Save button at the upper right hand of the panel.
j. Doing so will return you to the previous panel. Click on the Save button there as well.
-
How to Set-up a Click Event
-
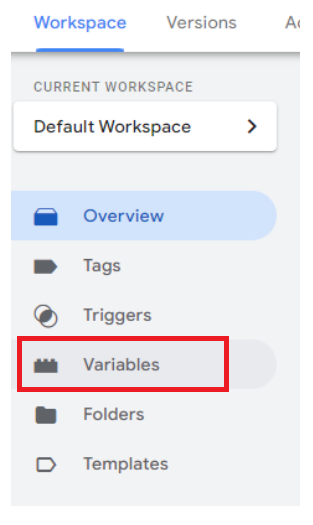
Go back to the Google Tag Manager workspace and click on Variables.
-
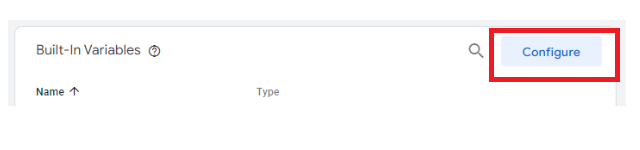
Click on the Configure button at the upper right hand of the Built-In Variables section.
-
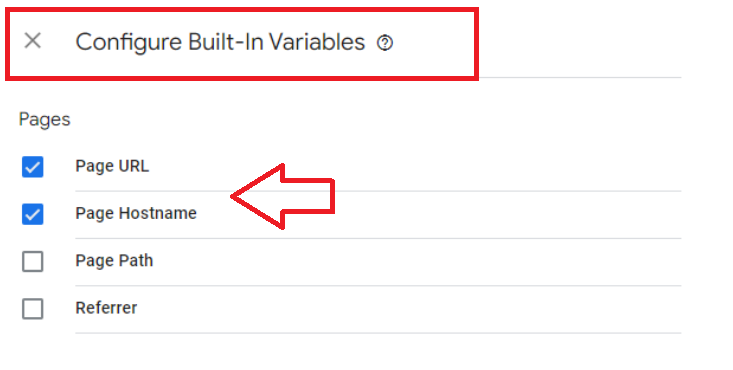
The Configure Built-In Variables panel will appear. Some of it may already have checks on them due to the configurations we’ve done earlier.
-
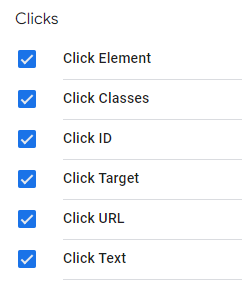
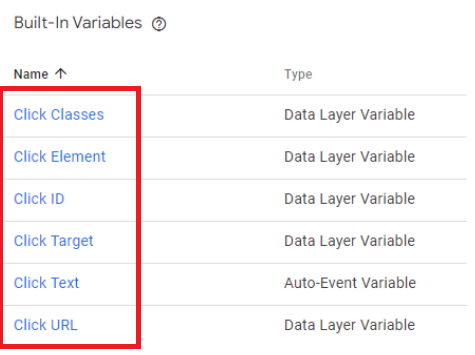
For the purposes of this part of our SOP, we are going to click on all the variables under Clicks.
-
If successful, these variables should appear under the Built-In Variables section.
-
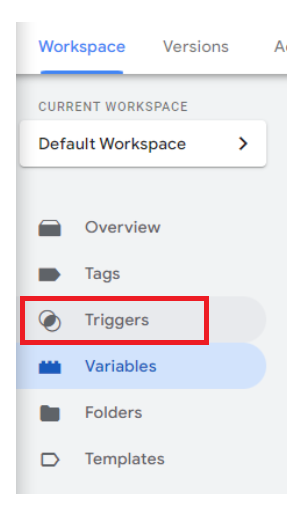
Now, click on Triggers from the side menu. Then click on the New button located at the upper right hand of the Triggers section**.**
-
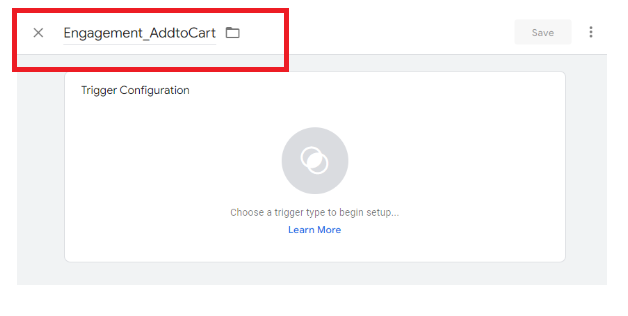
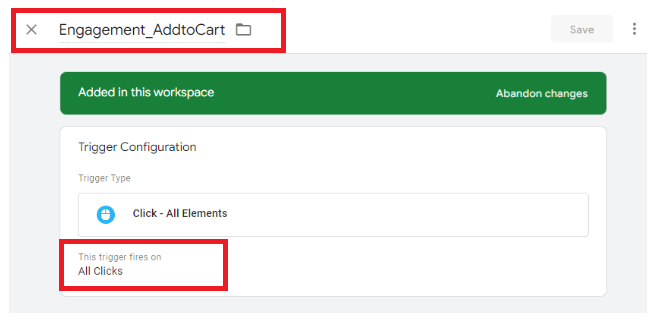
This will open the Trigger Configuration panel. It’s time to name our trigger once again. For the purposes of this SOP, let’s say that we are going to track all Add to Cart clicks.
As such, we are going to name this trigger as Engagement_AddtoCart.
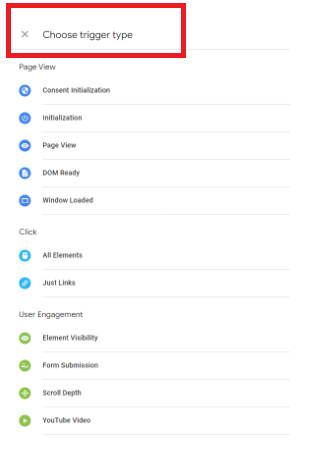
- Click on Choose a trigger type to begin setup… Doing so will open the Choose trigger type side panel.
-
Under Click, select All Elements.
-
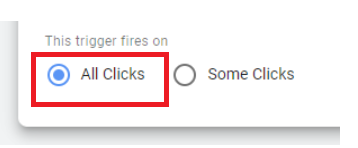
This will return you to the previous panel. From there, tick on All Clicks under the trigger firing instructions.
-
Then click on the Save button. You’ll find it at the upper right hand of the panel.
-
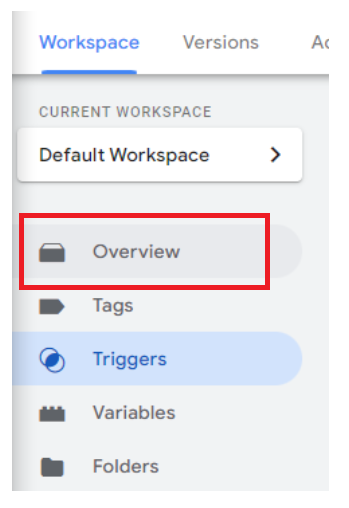
We are going to determine which of the variables we want to track. To do so, we are going to head over to Google Tag Manager’s Overview.
-
Then, click on the Preview button at the upper right hand of the dashboard. It’s beside the Submit button.
-
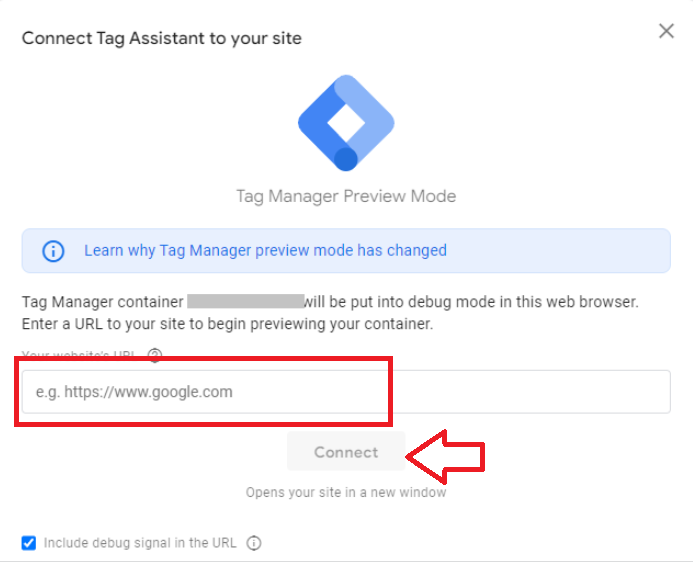
This will lead you to the Tag Assistant window. Type in your website or online shop’s URL then click on Connect.
-
A window leading to your website or online shop will then open. You will receive a notification at the lower right-hand corner of the screen that the Tag Manager Debugger successfully connected.
-
Then, hold down the Ctrl or Cmd key on your keyboard depending on the device you’re using. As you’re doing so, click on the button you want to track. Google Tag Assistant should be able to track this activity. You may check whether that was successful or not by going back to Google Tag Manager and looking at the data collected.
-
Take note of the Click ID if it has been filled.
-
If the Click ID didn’t show then you may use your HTML Class.
-
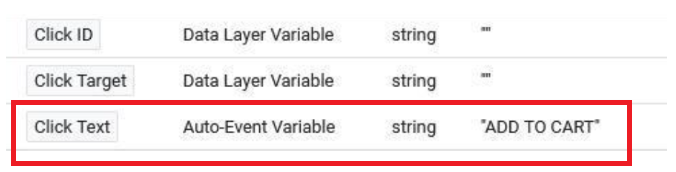
If you’re unsure of what your HTML Class is, then use the Click Text variable instead.
Remember: Just make sure that your Click Text isn’t being used in any other link. It should be unique. Otherwise, Google will track all the conversions coming from the other link as well.
- Let’s go back to Google Tag Manager and the Engagement_AddtoCart trigger. Click on All Clicks under the trigger firing instructions in Trigger Configuration.
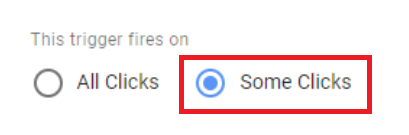
- Instead of All Clicks, select Some Clicks. Then configure it as Click Text > equals > ADD TO CART following the Click Text data provided earlier. Once done, click on the Save button at the upper right hand of the panel.

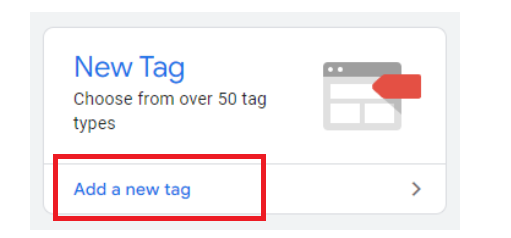
- You will be returned to the main workspace dashboard. Click on New Tag.
-
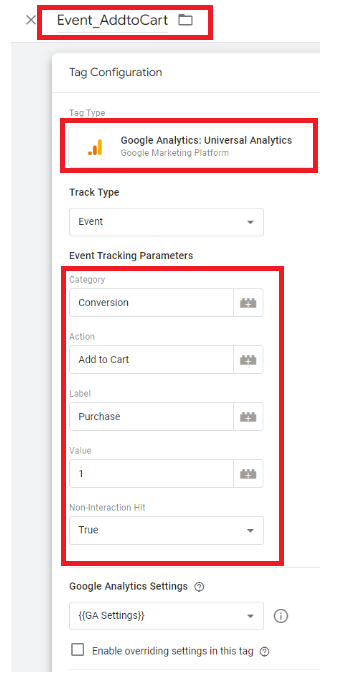
Rename this tag as Event_AddtoCart.
-
Use the configurations below as reference:
Remember: Again, you may tweak the parameters according to how your account is structured as well as how you want to analyze your data.
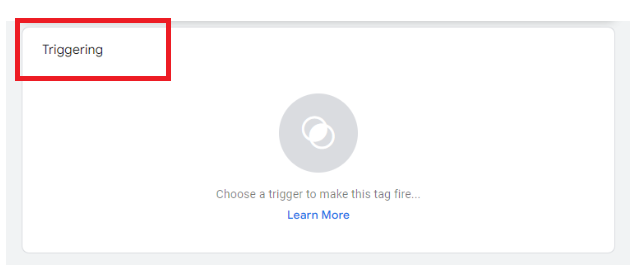
- Scroll down to the Triggering section and click on Choose a trigger to make this tag fire… Then select the Engagement_AddtoCart trigger we created earlier.
- Click on the Save button. Doing so will take you back to the workspace dashboard. From there, click on Submit. This will then open the Submit Changes panel.
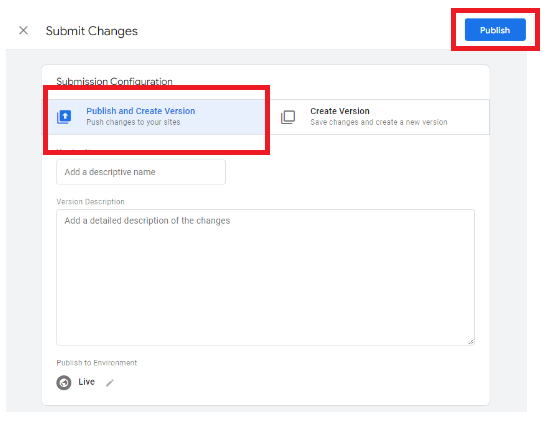
- You can add a Version Name and Version Description. However, both are optional. You may go ahead and click on the Publish button.
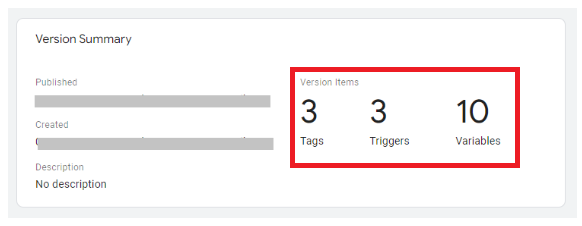
Then, a summary of all the changes you’ve made will be reported.
Configuring Google Analytics 4 Events as Conversion Goals
Note: Google Analytics limits you to 20 Goals for each view. Keep in mind that Google doesn’t allow users to delete Goals as well. You may edit them in future if you wish to do so, but we don’t recommend it. That’s because Google won’t change the Goal slot and its conversion even if you tweak it later on.
-
Go to your Google Analytics account settings by clicking the gear icon from the sidebar.
-
Choose the right Google Analytics Account, Property, and View.
Reminder: We recommend you perform these steps using the Staging View. You can always replicate things for the Master View anyway.
Reminder 2: Ensure you select the Universal Analytics property and not the one from Google Analytics 4. Universal Analytics properties have a “UA-” prefix in the Property ID.
-
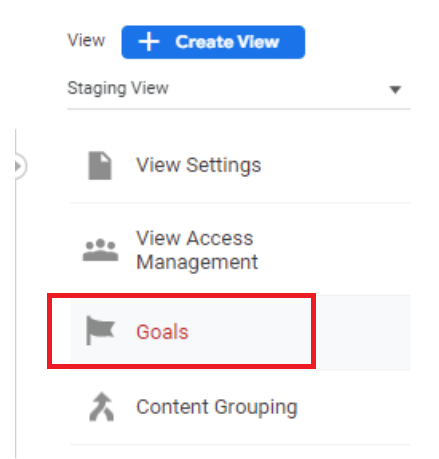
Then, select Goals under View.
-
Click on the New Goal button.
-
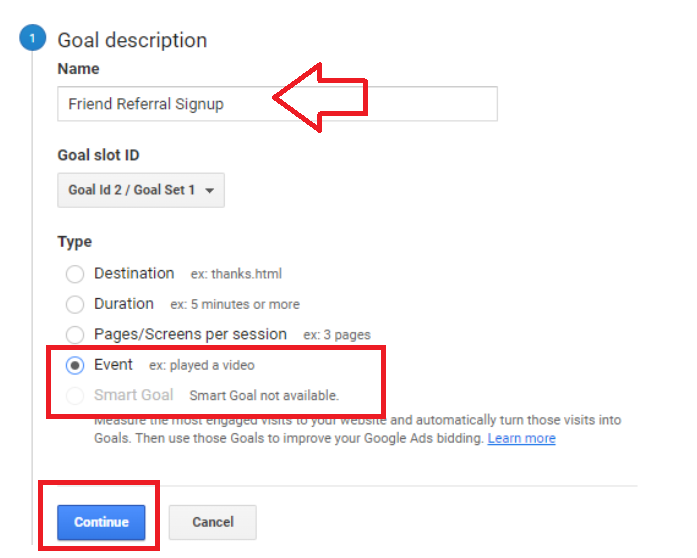
For the purposes of this SOP, we are going to name it Friend Referral Signup. Then, tick on Event and click on Continue.
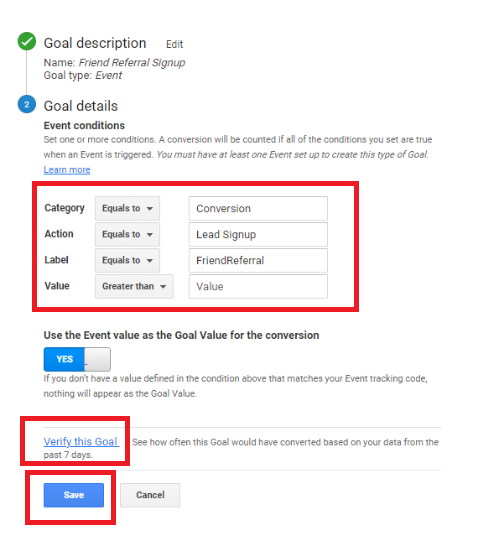
- Input the same event tracking parameters we used earlier. Those are:
-
Category: Conversion
-
Action: Lead Signup
-
Label: FriendReferral
However, leave Value empty. Then, click on Save.
- Finally, make sure that the Recording toggle is ON.
Setting up Google Analytics 4 Conversion Goals into your Google Analytics Account
Note: Google Analytics limits you to 20 Goals for each view. Keep in mind that Google doesn’t allow users to delete Goals as well. You may edit them in future if you wish to do so, but we don’t recommend it. That’s because Google won’t change the Goal slot and its conversion even if you tweak it later on.
-
Go to your Google Analytics account settings by clicking the gear icon from the sidebar.
-
Choose the right Google Analytics Account, Property, and View.
Reminder: We recommend you perform these steps using the Staging View. You can always replicate things for the Master View anyway.
Reminder 2: Ensure you select the Universal Analytics property and not the one from Google Analytics 4. Universal Analytics properties have a “UA-” prefix in the Property ID.
-
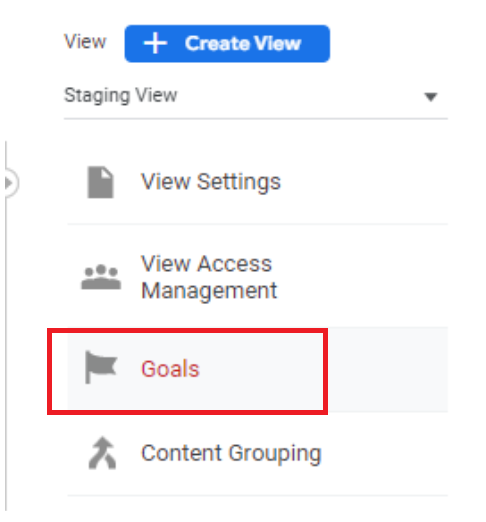
Then, select Goals under View.
-
Click on the New Goal button.
-
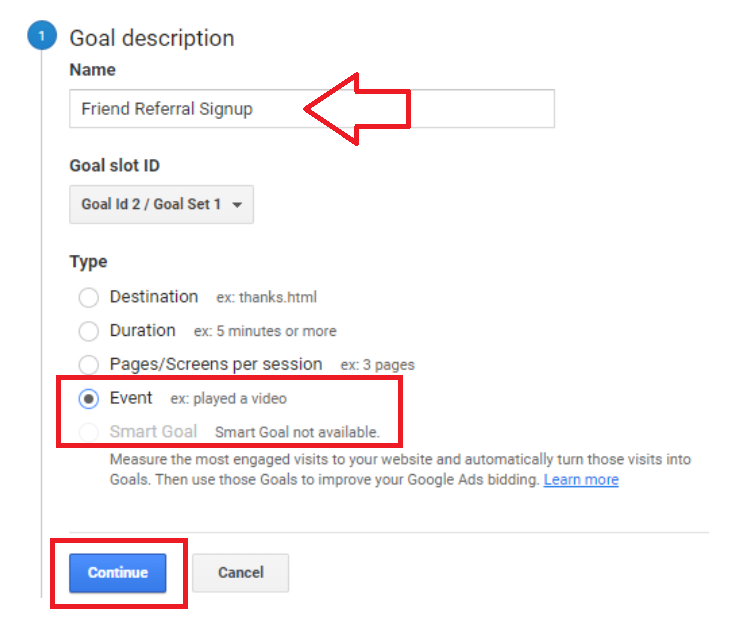
For the purposes of this SOP, we are going to name it Friend Referral Signup. Then, tick on Event and click on Continue.
-
Choose the goal you wish to track:
-
Destination: Choose this goal if you have a Thank You page for successful conversions.
-
Duration: Choose this goal for defining the length of each user session.
-
Pages or Screens per Session: Choose this goal for defining the number of pages a visitor accessed.
-
Event: Choose this goal for tracking specific events such as form submissions, mouse scrolls, or button clicks.
- Reminder: Only use this particular goal when you (or your programmer) have already implemented events in your website or online shopt.
-
Choose the option that best fits the goal you want to track:
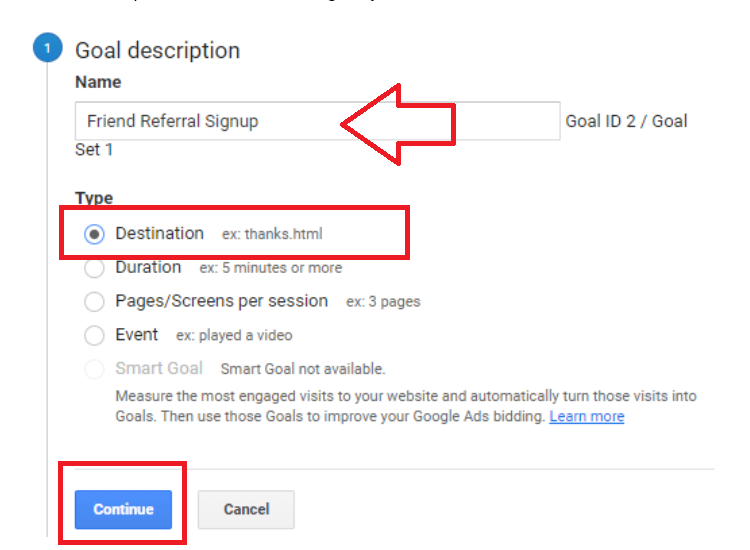
Setting up a Destination Goal
-
Choose Destination as your goal type**.** Then click on Continue.
-
Let us now configure this goal.
Reminder: You’re only required to input the URL path, not the full page URL.
(ie.: If your ‘Thank You’ page URL is ‘http://www.samplewebsite.com/thank-you-new-subscriber/’ only ‘/thank-you-new-subscriber/’ is needed.)
-
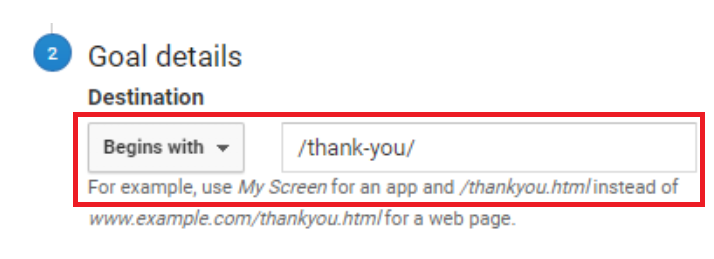
Destination:
-
Equals to: Choose this option if your page URL doesn’t contain any parameters. (i.e.: /thank-you/?name=Leo) i.e: [Equals to] /thank-you/
-
Begins with: Choose this option if your page URL contains parameters but no subpath (i.e.: /thank-you**/upsell/**?name=John) i.e.: [Begins with] /thank-you/
-
Regular Expression: Choose this option if your URL does not fit the previous cases. To do this, follow the steps we have shared above on using Google Tag Manager.
-
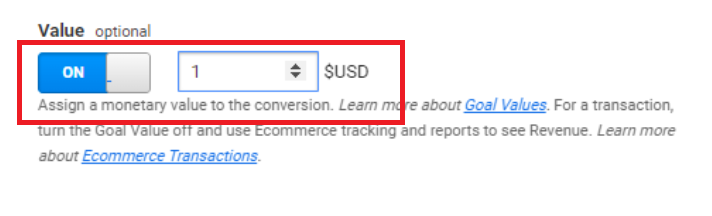
Value: Although optional, we still highly recommend filling out this field so even the equivalent revenue of your conversions is tracked.
-
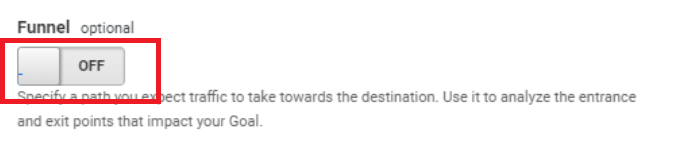
Funnel: You can leave this in the Off position unless you’re sure how you want to customize this option. Don’t worry, this parameter is optional as well.
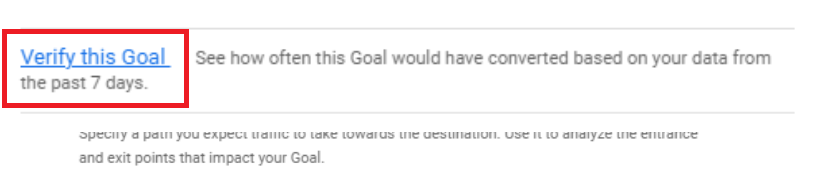
Note: If you believe that the goal you have just configured has already been triggered in the past week, then you may perform a quick text by simply clicking on Verify this Goal.
- Click on Save and again, make sure that the Recording toggle is set to ON.
Setting up a Duration Goal
Reminder: Do not confuse Session Duration with the time a visitor spent on your site. GA4 computes session duration by deducting the time of the first user engagement from the time of the last engagement hit. This is why the time a visitor spends on the final page will not count toward this metric if they do not trigger any engagement hit.
- Click on Duration then Continue.
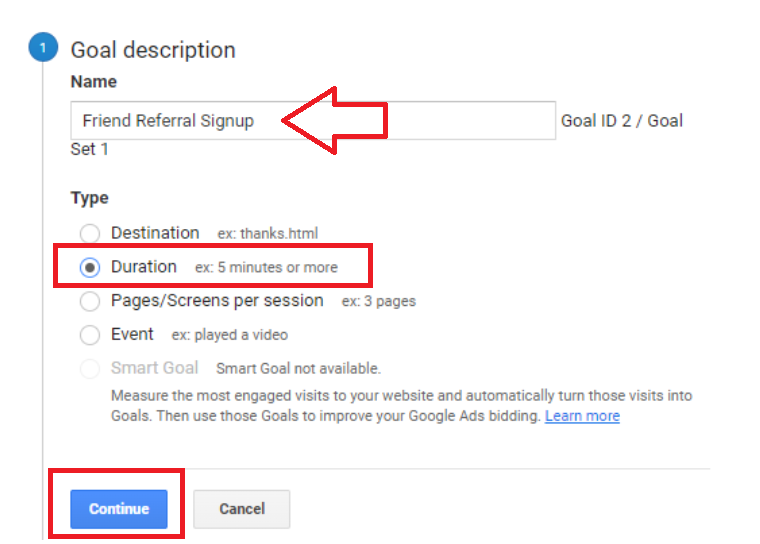
- Here are the settings for this Goal:
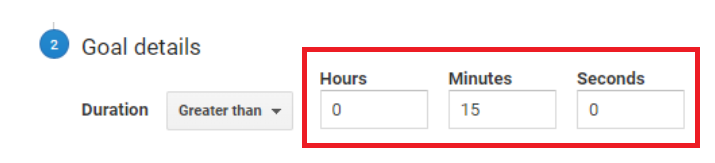
Duration: This is the session duration that you consider your goal completed. For the purposes of this SOP, let’s say that your goal is a 15-minute session.
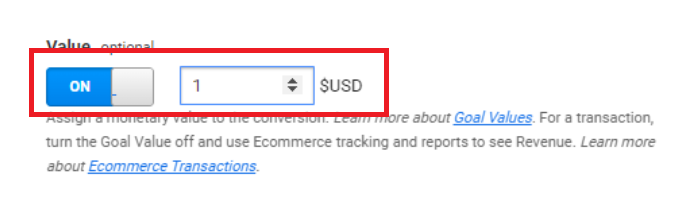
Value: Although optional, we still highly recommend filling out this field to get an estimated rate of how much each conversion is worth.
Note: If you believe that the goal you have just configured has already been triggered in the past week, then you may perform a quick text by simply clicking on Verify this Goal.

-
Click on Save and again, make sure that the Recording toggle is set to ON.
-
Tracking a Pages per Session Goal
-
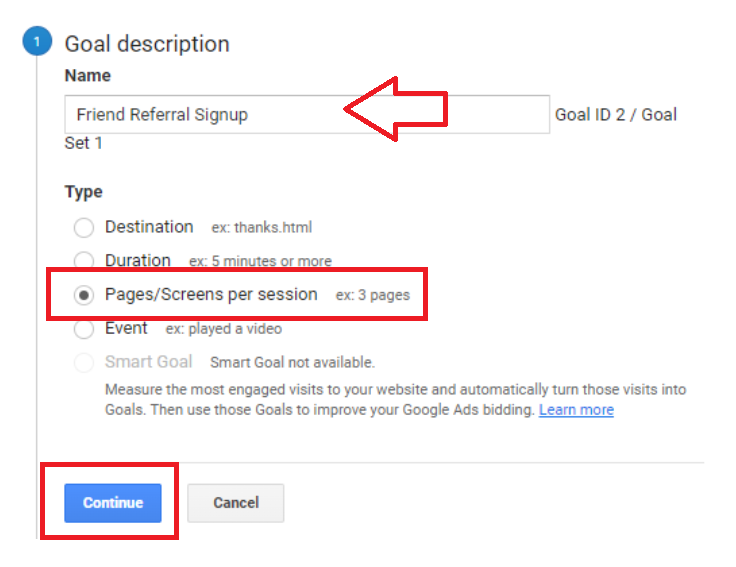
Click on Pages/Screens per Session and select Continue.
-
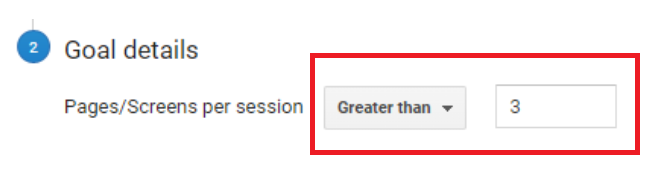
Here are the settings for this Goal:
-
Pages/Screens per Session: This refers to the number of pages that an online visitor has to view before you consider the goal achieved. For the purposes of this SOP, let’s say that you want each visitor to check out more than 3 pages per session.
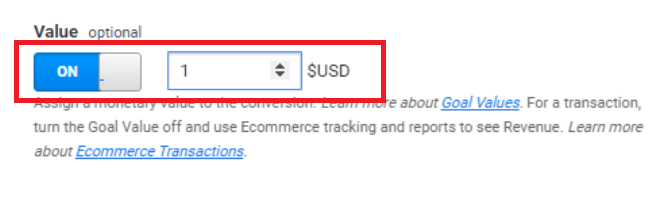
- Value: Although optional, we still highly recommend filling out this field to get an estimated rate of how much each conversion is worth.
-
Note: If you believe that the goal you have just configured has already been triggered in the past week, then you may perform a quick text by simply clicking on Verify this Goal.
-
Click on Save and again, make sure that the Recording toggle is set to ON.

Trying Out your Google Analytics Conversion Goals
-
Use Google Chrome to go to your website.
-
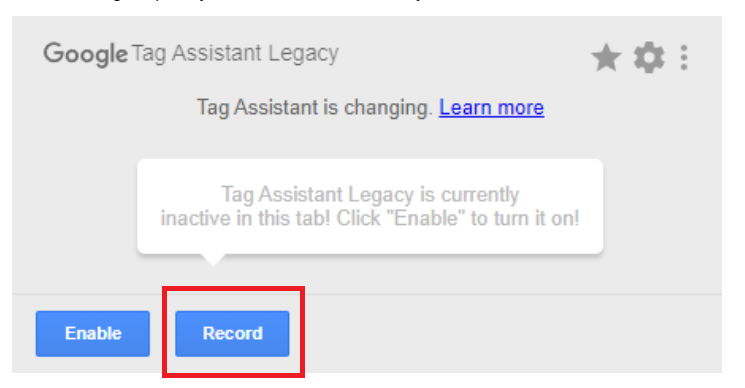
Download the Google Tag Assistant (Legacy) Chrome extension.
-
After setting it up on your browser successfully, click on its icon and hit Record.
-
Do the necessary action that triggers conversion. For instance, do you need to open your Thank You page? Submit a form? Or how about add something to your cart?
-
Once done, go back to the the Google Tag Assistant Chrome extension again and click on Stop Recording.
-
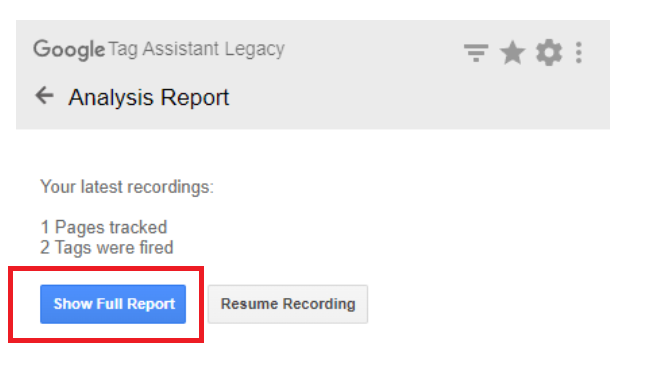
The extension’s Analysis Report window will open. Click on Show Full Report.
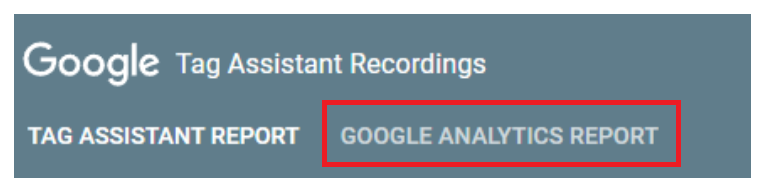
- Click Google Analytics Report at the heading of the page.
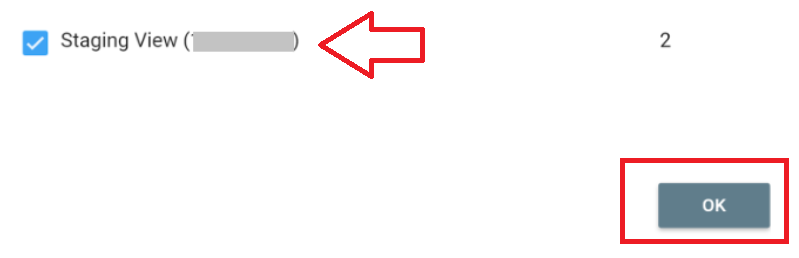
- Choose the view you wish to test and select OK. For the purposes of this SOP, we are going to select Staging View.
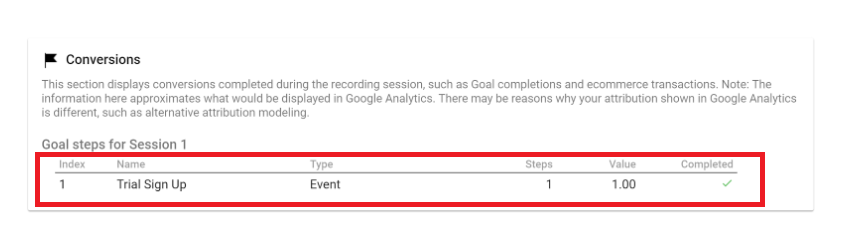
- Scroll down until you find the Conversions section. It will feature your Goal’s Name, Type, and Value among other data. It should also feature a green check under the Completed column.
- You can also use the Google Tag Assistant Chrome extension to make sure that your goal is not firing when you don’t want it to. To do this, go back to your website and launch the extension again. Click on Record.
Remember: You can also visit an unrelated page just to be sure. For instance, if your goal was to track how many page views your Thank You page gets, then just visit it then visit another page within your website or online shop.
- Again, click on Stop Recording, then Show Full Report. Afterward, go to Google Analytics Report at the top of the page. Choose the view you wish to test, then scroll down to Conversions. If the process is a success, you shouldn’t see new conversions showing up this time.
Conclusion
You’re done! Remember, setting up conversion goals in Google Analytics allows you to have a better grasp of particular website interactions that online visitors may perform on your pages. These may include purchases, submissions, file downloads, among other things.
This way, you can optimize your site to boost its sales and overall performance.
-
First, set up the necessary tools for the task. You’ll need an account in Google Analytics 4, Google Tag Assistant, and Google Tag Manager. The last two tools allow you to better configure some GA4 components.
-
You can track your Conversion Goals in two steps. The first is to use Google Tag Manager to set up GA4. The next step is configuring GA4 as Conversion Goals. The process for these is detailed above.
-
Next, configure particular GA4 events as conversion goals. This allows you to gather data for more specific visitor events within your site.
-
You can then set up your GA4 Conversion Goals in your Google Analytics account. This gives you broader goal-tracking capabilities. Aside from Event Goals, now you can set Destination, Duration, and Pages/Screens per Session Goals.
-
Lastly, don’t forget to test your Google Analytics Conversion Goals to ensure they work properly or that no parameter needs additional tweaking.