Efficient Workflow Management with Shopify Flow
To provide a step-by-step guide on how to manage workflows with Shopify Flow efficiently.
Prefer a shortcut? 16 free tools do parts of this for you.

Aim: To provide a step-by-step guide on how to manage workflows with Shopify Flow efficiently.
Optimal Outcome: Efficient and effective management of workflows to automate tasks and improve business operations.
What do you need to start: To perform this SOP, you will need to have an access to a Shopify account and active workflows in Shopify Flow
Why is this SOP Important: Shopify Flow allows for the automation of repetitive and time-consuming tasks, which can save a significant amount of time and improve efficiency in a business. However, proper management of workflows is necessary to ensure they continue to operate smoothly and meet the changing needs of the business.
When and Where to execute: This SOP can be executed anytime from anywhere with access to a Shopify account.
Who Should Be Doing This: The business owner or the person responsible for managing workflows in a business.
What are workflows?
In Shopify, workflows are automated sequences of actions triggered by specific events or conditions. They can be created and managed using the Shopify Flow app. Workflows can help streamline and automate various tasks and processes, such as order fulfillment, inventory management, and customer communications. They can also help merchants save time and reduce the risk of errors by automating repetitive and time-consuming tasks.
Execution
Resources/Tools & Set up
-
Access to a Shopify account
-
Active workflows in Shopify Flow
Duplicate your workflow
Duplicating a workflow in Shopify Flow allows you to create a new workflow based on an existing one. This can be useful if you want to make minor modifications to a workflow without starting from scratch or if you want to create a similar workflow for a different channel or event.
-
Go to your Shopify admin and click on Settings > Apps and sales channels
-
Select Shopify Flow.
-
Open the app and locate the workflow that you want to duplicate.
-
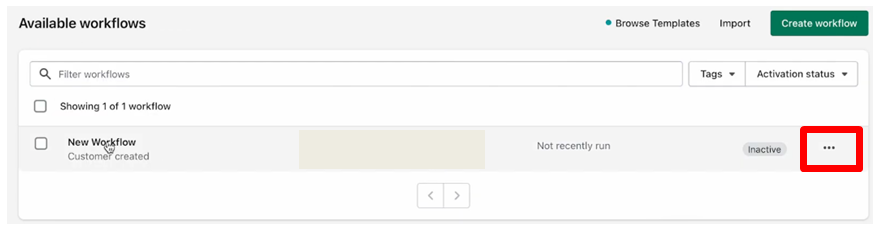
Click on the "..." button beside it, and then click “Duplicate workflow”.
-
Provide a new name for the copy.
-
Click “Duplicate workflow” to complete the process.
💡 Tip: You can use the duplicate feature if you want to:
-
Create a backup copy of a workflow before making significant changes to it.
-
Use a workflow as a template for creating new workflows with similar functionality.
-
Make changes to a workflow for testing purposes before implementing those changes in the live workflow.
-
Make modifications for different sales channels or customer groups.
-
Transfer a workflow to another store in your organization.
Copy a workflow to another store
If you have the Shopify Flow app and channel permission, and your store is on the Shopify Plus plan, you can copy workflows between stores in your organization. Copying a workflow to another store allows users to replicate the workflow in multiple stores within the organization.
This feature is helpful when businesses have multiple stores and want to implement the same workflow across all of them. By copying the workflow to another store, businesses can save time and effort in recreating the same workflow multiple times. To copy a workflow, follow these steps:
-
From your Shopify admin, click Settings > Apps and sales channels.
-
From the Apps and sales channels page, click Shopify Flow.
-
Click Open app.
-
Find the workflow that you want to copy, and then click the three dots (...).
-
Click Copy to another store.
-
A new window will open where you can search for and select the stores you want to copy the workflow to. Only stores that you have Shopify Flow app permissions for are displayed.
-
Select the stores you want to copy the workflow to.
-
Click Copy workflow.
Export a workflow
Shopify workflows can be exported as a .flow file for sharing with others or creating a backup copy. To ensure privacy, make sure to remove any sensitive or identifying information before exporting. To export workflows, follow these steps:
-
Go to your Shopify admin and click on "Settings > Apps and sales channels."
-
Find and click on "Shopify Flow" from the list of apps.
-
Click "Open app."
-
Select the workflows that you want to export.
-
Click "Export workflows."
💡 Tip: You can use the export feature if you want to:
-
Share workflows with colleagues or clients: You can export workflows and share them with colleagues or clients who may be interested in replicating your workflow or using it as a starting point for their own workflows.
-
Back up workflows: Exporting workflows is an easy way to create a backup of your workflows that you can use to restore them in case of data loss or system failure.
-
Collaborate with other businesses: If you work with other businesses or vendors, you can export your workflows and share them with them, allowing for better collaboration and integration between your systems.
-
Repurpose workflows: You can export your workflows and repurpose them for different tasks or channels, saving time and effort in creating new workflows from scratch.
-
Analyze workflows: Exporting workflows can also be useful for analyzing them and identifying areas for optimization or improvement. By reviewing the workflows in a different format, you may discover new insights or opportunities for streamlining processes.
Import a workflow
It is possible to import workflows from other merchants or backup copies. However, before enabling a workflow that was not created by your organization, it is essential to review it carefully to ensure that it meets your business requirements. Specifically, make sure that:
-
Email and messaging addresses are correctly directed.
-
The message style and tone match your business.
-
Any actions that use messaging services not used by your organization are replaced with actions that send an email.
Follow the steps below to import workflows:
-
Go to your Shopify admin and click on Settings > Apps and sales channels.
-
Click on “Shopify Flow” from the Apps and sales channels page.
-
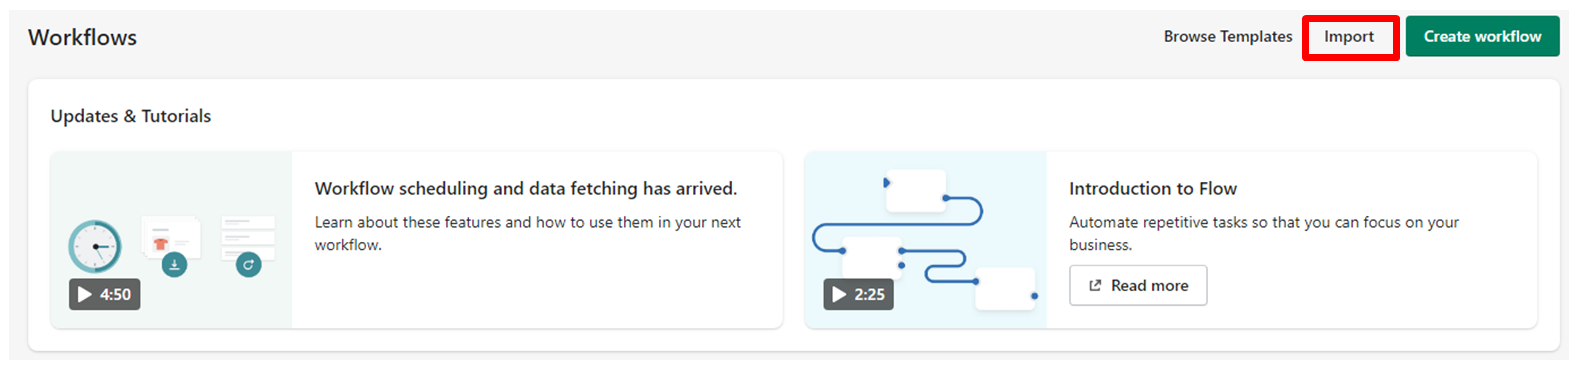
Open the app and click on “Import”.
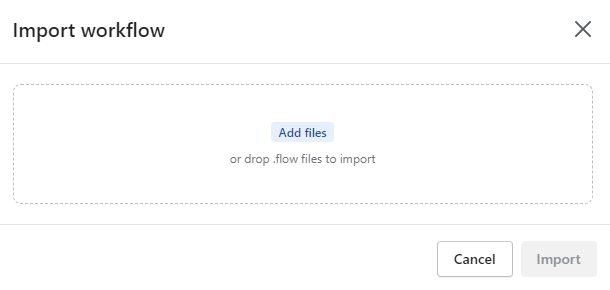
- Add files or drag a .flow file from your desktop to the Import workflow box.
-
If needed, click on Preview workflows to review them before importing.
-
Click on Import.
Delete a workflow
To remove workflows that are no longer required, you can delete them from the Shopify Flow app. It's important to note that deleted workflows cannot be retrieved, so it's recommended to export a copy before proceeding with the deletion. However, you can only delete inactive workflows.
Here are the steps to delete a workflow:
-
Access your Shopify admin and go to Settings > Apps and sales channels.
-
Select “Shopify Flow” from the list of apps and channels.
-
Open the app and choose the workflows you want to delete.
-
Check the box next to the workflow title then click on “Delete workflows” to remove them.
Note: If you want to delete an active workflow, you must first deactivate it by clicking the workflow and selecting Turn off.
Conclusion
You’re done! Efficient workflow management is essential for a successful Shopify store. By following this SOP, you can easily duplicate, copy, export, import and delete workflows to streamline your business processes. This will help you save time and increase productivity, ultimately resulting in increased revenue.
Execution Checklist:
-
To duplicate a workflow, click on '...' beside the workflow and then click on Duplicate Workflow.
-
To copy a workflow to another store, click on 'Copy to another store' beside the workflow and select the stores to copy the workflow to.
-
To export a workflow, select the workflow and then click on Export Workflows.
-
To import a workflow, click on Import and then click on Add Files or drag a .flow file to the Import workflow box.
-
To delete a workflow, select the workflows to delete and click on Delete workflows.