Creating New Shopify Workflows Fast Using Templates
This SOP aims to provide a step-by-step guide for creating new Shopify workflows quickly using templates.
Prefer a shortcut? 16 free tools do parts of this for you.

Aim: This SOP aims to provide a step-by-step guide for creating new Shopify workflows quickly using templates.
Optimal Outcome: The optimal outcome of following this SOP is to create a customized workflow that meets your unique business needs in a fast and efficient manner.
What do you need to start: Access to a Shopify account, Shopify Flow app installed, knowledge of basic workflow creation concepts and other apps you want to connect to your workflow.
Why is this SOP Important: This SOP is important because it provides a clear and concise guide for creating new workflows on Shopify using pre-built templates. By following this SOP, users can save time and increase efficiency when creating custom workflows that meet their specific business requirements.
When and Where to execute: This SOP can be executed whenever a new workflow needs to be created on Shopify. The execution can take place at any location where there is access to a computer and the internet.
Who Should Be Doing This: This SOP is intended for anyone who needs to create workflows on Shopify, including business owners, managers, and employees. It is recommended that the person executing this SOP has a basic understanding of Shopify and workflow creation concepts.
What are templates?
In Shopify Flow, templates are pre-built workflows that users can choose and customize to automate specific tasks within their Shopify store. Templates can be modified to meet individual business needs and provide a faster way of creating new workflows compared to starting from scratch. Templates in Shopify Flow cover a variety of use cases, including order management, customer management, and inventory management. Some examples of pre-built templates in Shopify Flow include sending email notifications for high-risk orders, applying tags to customers based on their order history, and updating product inventory based on sales volume. By using templates, Shopify Flow users can save time and streamline their workflow creation process.
Execution
Resources/Tools & Set up
-
Shopify account
-
Shopify Flow app installed
-
Knowledge of basic workflow creation concepts
-
Other apps (that needs to be automated) installed
Choose the right template
Choosing the right workflow template on Shopify Flow is essential for automating tasks that match your business needs. Here are some tips to keep in mind when selecting workflow templates:
-
Determine your business needs: Start by identifying the tasks that you want to automate. Consider your business goals, pain points, and areas where automation can make the biggest impact.
-
Explore available templates: Browse the available templates in Shopify Flow and review the description and details for each. Pay attention to the trigger, conditions, and actions, and evaluate whether the template matches your specific needs.
-
Customize the template: Once you have identified a template that matches your needs, consider how you can customize it to meet your unique requirements. For example, you may need to modify the actions or conditions to reflect your business rules.
-
Test the template: Before activating the workflow, test the template to ensure that it is functioning as expected. Make any necessary adjustments, and review the results to ensure that it is meeting your goals.
-
Evaluate the results: Monitor the workflow's performance over time, and analyze the results to determine whether it is meeting your business goals. Make any necessary adjustments or modifications to improve its effectiveness.
Use a template to create a workflow
To create a new workflow in Shopify Flow using a template, follow these steps:
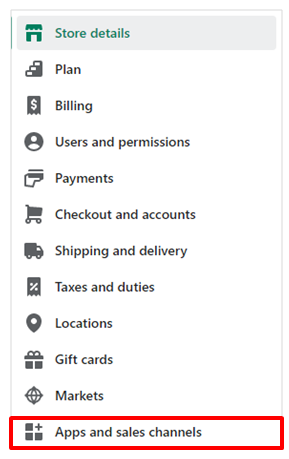
- Access your Shopify admin and navigate to “Settings” then “ Apps and sales channels”.
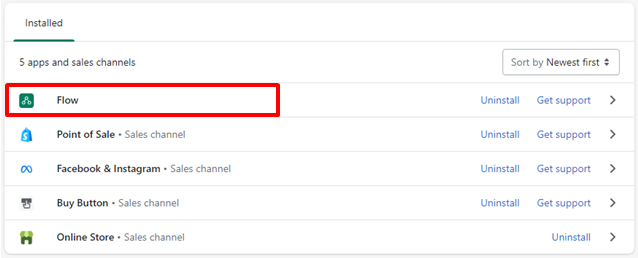
- From the Apps and sales channels page, click “Flow” to open the app.
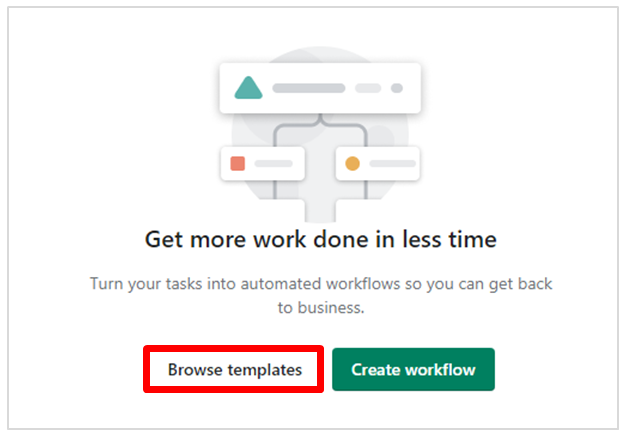
- Click “Browse Templates” and choose a template from the available options.
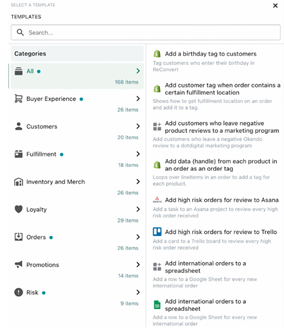
Here are the types of templates to choose from:
-
Buyer Experience: These templates focus on enhancing the customer's shopping experience. They automate tasks such as order confirmation emails, delivery notifications, and product recommendations.
-
Customers: These templates automate tasks related to customer management, such as tagging customers based on their purchase behavior or sending personalized discount codes.
-
Inventory and Merch: These templates streamline inventory management tasks, such as updating product availability, adjusting prices based on demand, and generating purchase orders.
-
Loyalty: These templates help increase customer retention by automating tasks related to loyalty programs, such as sending reward reminders and personalized offers.
-
Orders: These templates automate tasks related to order processing, such as updating order statuses, creating shipping labels, and sending notifications to customers.
-
Promotions: These templates automate tasks related to promotions and discounts, such as applying discounts to specific products or collections, creating BOGO offers, and generating unique discount codes.
-
Risk: These templates help merchants mitigate risk by automating tasks such as fraud analysis, blocking high-risk orders, and sending alerts to the relevant stakeholders.
- Review the template to ensure that it aligns with your requirements. Templates in Shopify Flow come with pre-filled triggers, conditions, and actions, using placeholder data. However, it is essential to customize the template and input the desired values before activating the workflow. For instance:
-
If your workflow involves adding tags to customers or orders, ensure that you verify the tags you are using.
-
If your workflow requires sending messages, update the recipient information, such as email addresses.
-
If you do not want to use a particular app, look for an alternative function that meets your needs. For example, replacing a Slack message action with an email action.
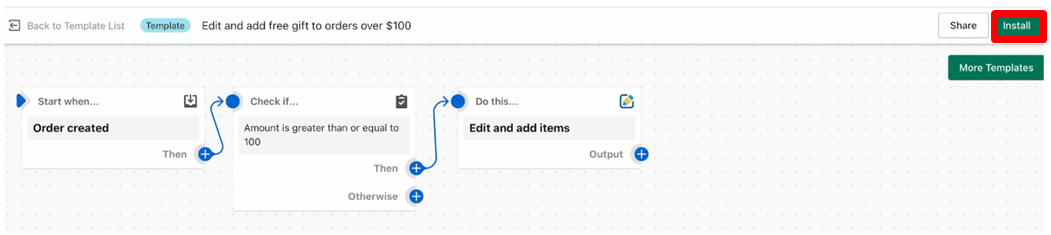
- Click “Install” located on the upper right corner of the screen.
-
Make any necessary modifications to the template.
-
You can also edit the title of the workflow by clicking on its name.
-
When ready to use the workflow, click "Turn on workflow" to start using it.
Conclusion
You’re done! Remember, by following this SOP for creating new Shopify workflows using templates, you can save time and effort by utilizing pre-built templates that suit your business needs. You can quickly create new workflows, edit them as required, and turn them on to automate your business processes.
Execution Checklist:
-
Open the Shopify Flow app.
-
Create a new workflow.
-
Select your preferred template.
-
Review the template and customize it as necessary.
-
Install the template.
-
Edit the template to make any additional changes.
-
Optionally, edit the title of the workflow.
-
Turn on the workflow.