Setting Up a New Workflow on Shopify: A Step-by-Step Guide
To guide users on how to set up a new workflow on Shopify.
Prefer a shortcut? 16 free tools do parts of this for you.

Aim: To guide users on how to set up a new workflow on Shopify.
Optimal Outcome: Successfully setting up a new workflow on Shopify that streamlines your business processes.
What do you need to start: A Shopify account with access to Shopify Flow, knowledge of your business processes and the areas that need to be automated and familiarity with the Shopify Flow interface.
Why is this SOP Important: Setting up a new workflow on Shopify can help automate repetitive tasks, reduce errors, and increase efficiency in your business processes. This can save time and resources, leading to higher productivity and better customer experiences.
When and Where to execute: This SOP can be executed at any time and from anywhere as long as you have access to your Shopify account and internet connection.
Who Should Be Doing This: This SOP is intended for business owners, managers, or employees with the necessary permissions and access to Shopify Flow.
What is Shopify Flow?
Shopify Flow is an ecommerce automation platform that allows Shopify merchants to create and automate workflows to manage their businesses more efficiently. It is a visual automation tool that helps merchants streamline their daily tasks, saving time and effort. Shopify Flow offers a range of pre-built workflow templates that merchants can customize to suit their business needs. It can also integrate with other Shopify apps and services, as well as external tools such as email marketing platforms, to create more complex workflows. With Shopify Flow, merchants can automate tasks such as inventory management, order processing, and customer engagement, allowing them to focus on growing their business.
Execution
Resources/Tools & Set up
-
Shopify account with access to Shopify Flow
-
A list of business processes and the areas that need to be automated
Plan your workflows
Planning your workflow is important to ensure that it is efficient, effective, and meets your business needs. Without proper planning, you may end up with a workflow that is overly complex, difficult to manage, or fails to address the intended problems. The following steps will help you save you time, effort, and resources in the long run, and help you achieve your business goals more effectively.
-
Identify the problem: Determine what issues you want to solve or opportunities you want to capitalize on with the workflow.
-
Define the workflow: Clearly define the steps involved in the workflow, the roles of each team member, and the outcomes you expect to achieve.
-
Map out the process: Visualize the workflow using diagrams or flowcharts to help you see how it works and identify potential issues.
-
Determine the triggers: Identify the events or conditions that will trigger the workflow, such as a new order, a change in inventory levels, or a customer complaint.
-
Choose the actions: Decide what actions should be taken when the workflow is triggered, such as sending an email notification, updating inventory levels, or assigning a task to a team member.
-
Test the workflow: Before implementing the workflow, test it thoroughly to ensure that it works as intended and doesn't create any unintended consequences.
Review Shopify Flow considerations
Here are the considerations to keep in mind before creating a workflow:
-
Workflows are executed as soon as possible but there might be a delay between the start of the trigger and the completion of actions.
-
Orders and draft orders are treated separately by Flow. Actions and triggers that affect orders do not affect draft orders and vice versa.
-
Workflows containing tag-related conditions might not function correctly if there are more than 250 tags associated with the order, product, or customer.
-
Every workflow must start with a trigger from Shopify Flow or an app.
-
Some fields in the GraphQL Admin API are populated asynchronously, particularly on orders, which might lead to unexpected results. Before activating a workflow, ensure that you test it to verify the expected data.
-
If possible, use a trigger that starts workflows based on conditions being fulfilled rather than the creation of an order. For example, use the Order risk analyzed trigger instead of Order created when creating a workflow that takes actions based on an order's risk level.
-
These considerations are crucial to creating workflows that work as intended and produce the desired outcomes.
Create a new workflow
Here are simplified steps for creating a workflow on Shopify Flow, which starts with selecting a trigger, followed by creating a condition and selecting an action. You can add more conditions and actions for a more complex workflow:
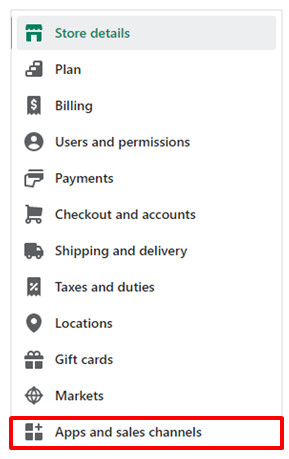
- Go to “Settings” then click “Apps and sales channels” in your Shopify admin.
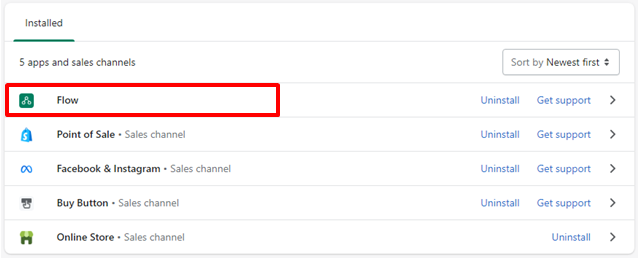
- Click “Flow”.
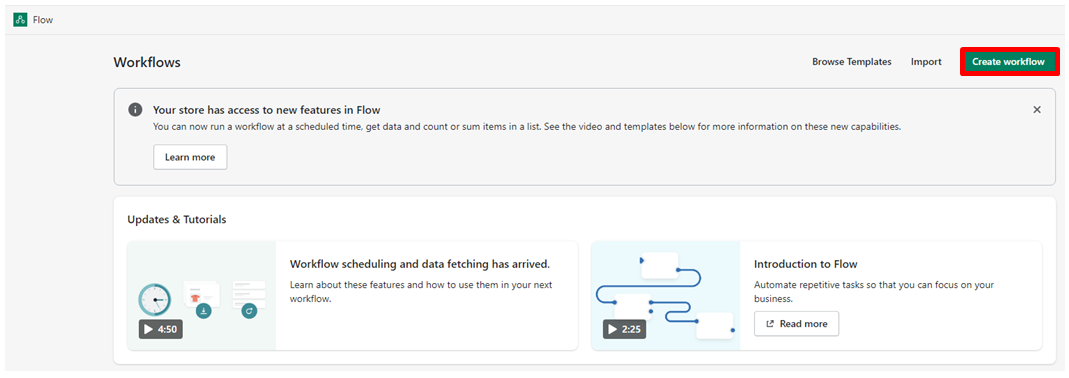
- Click “Create workflow”.
- Click “Select a trigger” and choose a “trigger” to start the workflow.
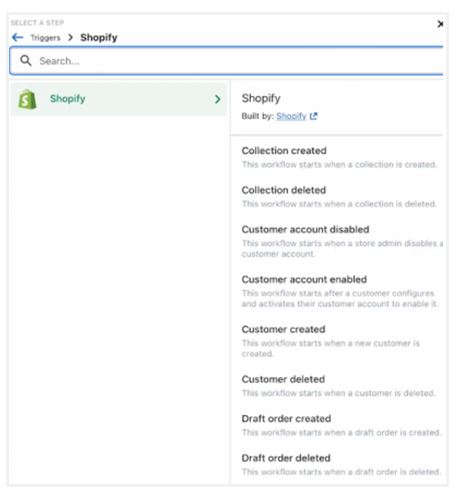
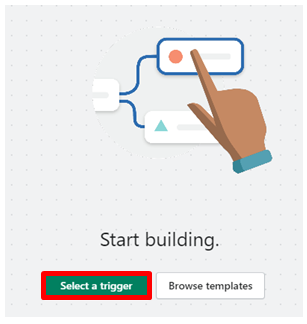
📝Note: In Shopify Flow, a trigger is an event or a condition that initiates a workflow. When the specified event or condition occurs, it triggers the workflow and sets it in motion. For example, an order being created or a product being updated can be set as triggers for a workflow. Triggers are the starting point for workflows and allow merchants to automate tasks based on specific events or conditions within their Shopify store.
- Set a “Condition” that must be met before any actions can be run.
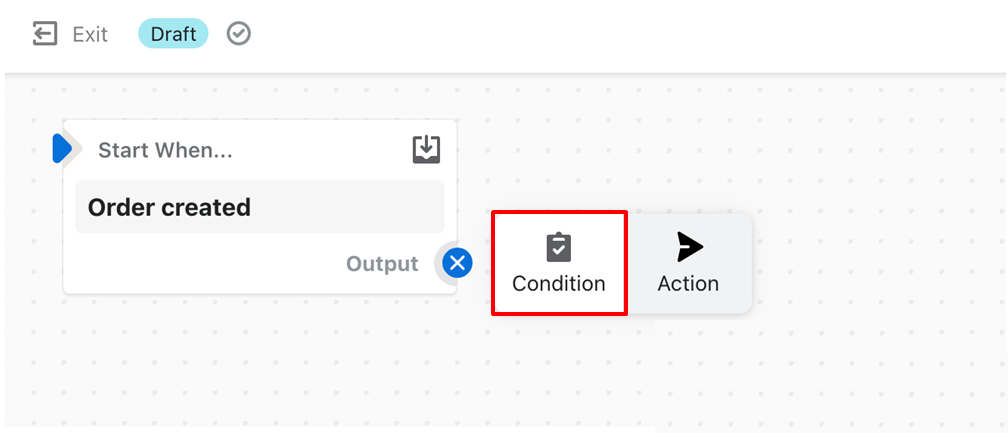
📝Note: In Shopify Flow, a condition is a step that specifies a rule or criteria that needs to be met before an action can be executed. It helps to ensure that the workflow runs only when certain conditions are met.
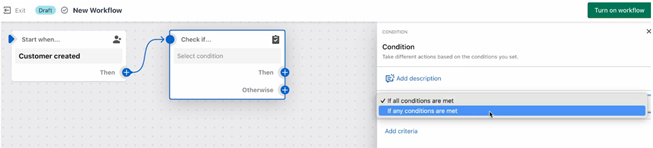
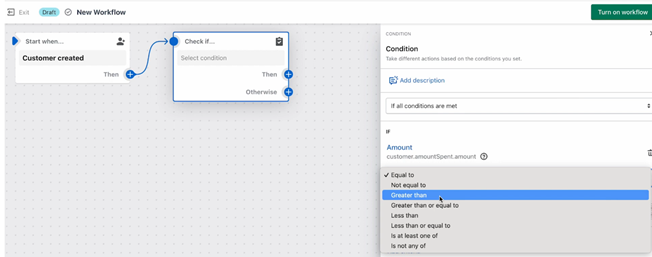
Conditions serve as guidelines that allow for the verification of basic characteristics, such as a customer's consent to receive promotional messages or the amount of an order exceeding a particular threshold. Meanwhile, logical operators are instruments that can be employed to evaluate more intricate properties.
You can use the following operators when creating conditions:
-
Equal to
-
Not equal to
-
Greater than and Greater than or equal to
-
Less than and Less than or equal to
-
Any of
-
Not any of
-
Includes
-
Does not include
-
Starts with
-
Does not start with
-
Ends with
-
Does not end with
- Select an “Action” to be taken if the condition is true.
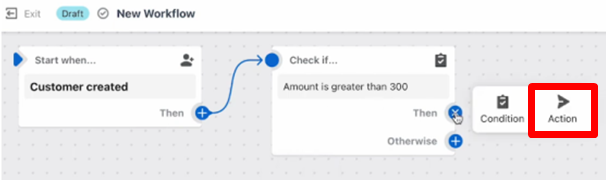
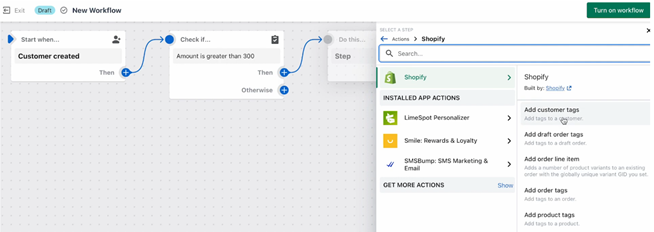
📝Note: An action is a specific task or operation that can be performed on an order, product, or customer. Actions can include things like sending an email notification to a customer, tagging an order, creating a task for a team member, or updating a product's inventory level. When an event occurs, Shopify Flow evaluates any conditions that have been set and then executes the specified actions.
-
Add additional conditions or actions if needed.
-
Enter a title for your workflow and click "Turn on workflow" to start using it.

⚠️Reminder: It is important to test the workflow before deploying it to ensure that it operates as intended and any issues are identified and resolved. This will help prevent any unexpected results or errors from occurring during actual use.
Conclusion
You’re done! In conclusion, setting up a new workflow on Shopify can be a valuable way to automate tasks and streamline your business operations. By following the steps outlined in this guide, you can create a customized workflow that fits your unique business needs. Before deploying your workflow, it is important to test it thoroughly to ensure that it operates as intended. To create your workflow, follow this execution checklist:
-
Log in to your Shopify account
-
Access the Shopify Flow app
-
Create a new workflow
-
Choose a trigger
-
Set conditions
-
Choose actions
-
Set a name and turn on workflow