How to Conduct a URL Audit on a Website
To conduct a URL audit on Shopify to determine which pages need to be indexed, deindexed, redirected, or canonicalized
Prefer a shortcut? 16 free tools do parts of this for you.

Aim: To conduct a URL audit on Shopify to determine which pages need to be indexed, deindexed, redirected, or canonicalized
Optimal Outcome: Website's pages are properly indexed, deindexed, redirected, or canonicalized, leading to improved website performance, higher search engine rankings, and increased traffic.
What do you need to start: You will need access to your Shopify account, a list of all URLs for your website, and a spreadsheet tool such as Microsoft Excel or Google Sheets.
Why is this SOP Important: A URL audit is essential to maintaining a healthy website and ensuring that your pages are optimized for search engine rankings. By identifying which pages need to be indexed, deindexed, redirected, or canonicalized, you can improve your website's overall performance and search engine visibility.
When and Where to execute: This SOP can be executed at any time during the website's lifetime. It is recommended to conduct a URL audit whenever there are major changes made to the website, such as new pages being added or old pages being removed.
Who Should Be Doing This: This task can be performed by the website owner, developer, or an SEO specialist.
What is a URL audit?
A URL audit on a website is a process of analyzing a website's URLs to ensure that they are all functioning correctly and optimized for search engines. The audit involves reviewing each URL to determine which pages need to be indexed, deindexed, redirected, or canonicalized. The aim of the audit is to improve the overall performance and ranking of the website in search engine results pages (SERPs). It is an essential step for any website owner who wants to ensure that their website is optimized for SEO and user experience. By conducting a URL audit, website owners can identify and fix any technical issues that may be hindering their website's visibility and performance on search engines.
Execution
Resources/Tools & Set up
-
Shopify account
-
List of website URLs
-
Temp 011: The URL Inspection Worksheet
Collect all URLs on your website
-
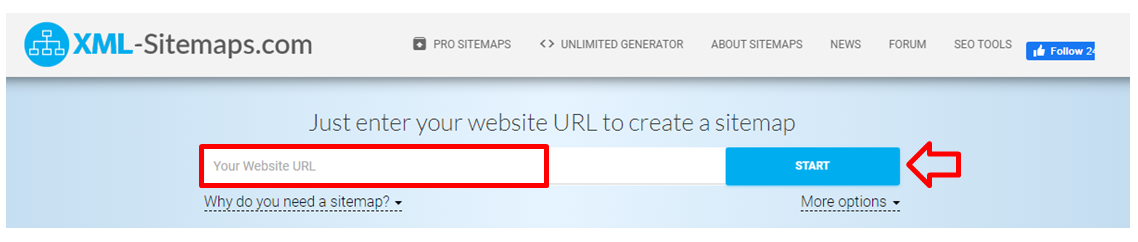
Go to this XML sitemap tool.
-
Enter your website address to the text box then click on“Start”.
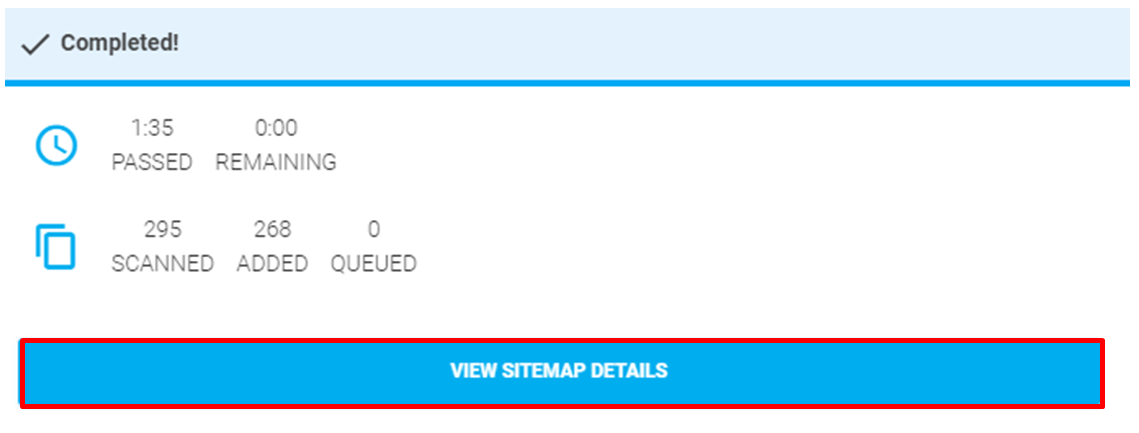
- Wait for the tool to complete crawling on your website. Once the process is completed, click “View Sitemap Details”.
- Select and copy all the URLs on the list.
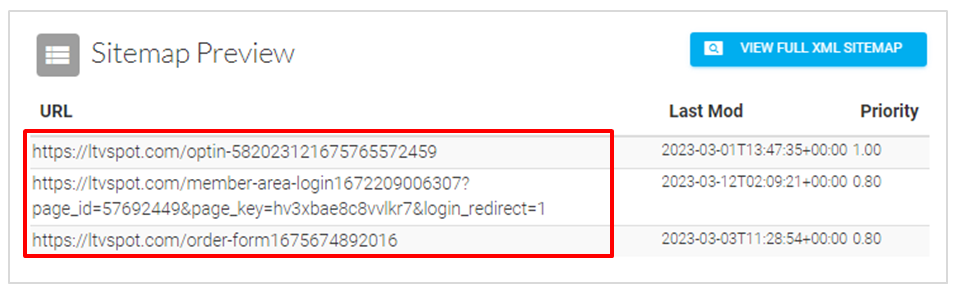
📝 Note: If you have a website that has greater than 500 pages, you will need to subscribe to a plan to be able to extract all your website’s URL.
Categorize the URLs
The URL categorization process may take some time, depending on the number of URLs your website has. Nonetheless, it is a crucial step that you cannot skip if you want your website to be optimized appropriately for search engines.
-
Open a copy of The URL Inspection Worksheet.
-
Create a new sheet and paste the copied URLs as ‘Values only’.
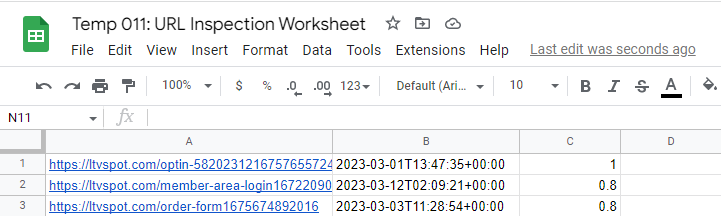
- Select and copy the links on Column A then paste on the “URL List” column of the “Uncategorized URLs” sheet.
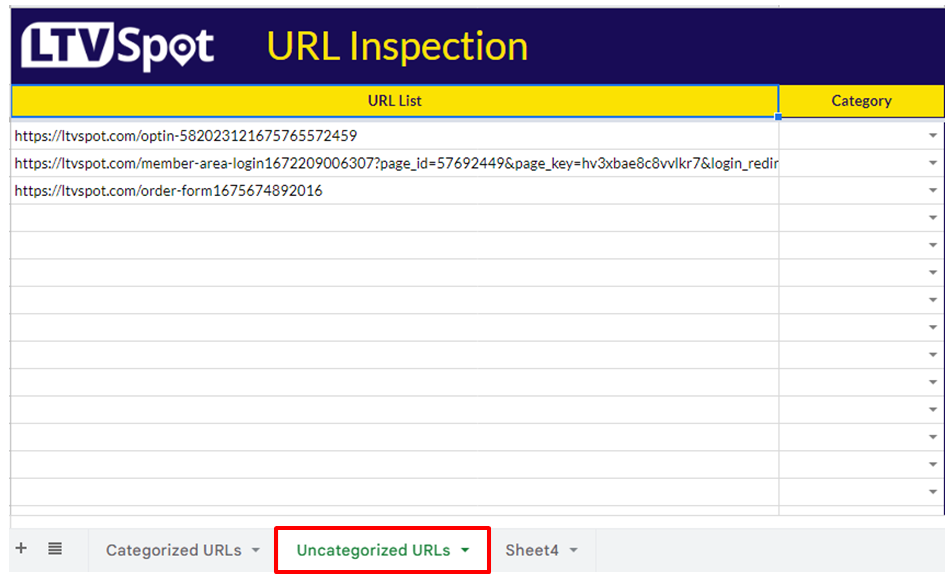
- Select a “Category” for each URL.
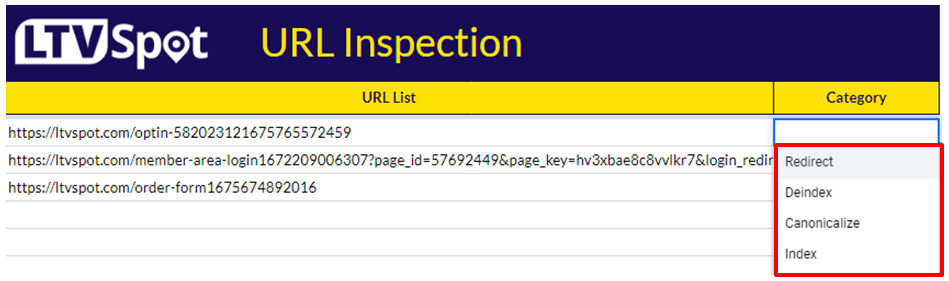
Index: Refers to allowing search engines to include a page in their search results. Pages that are indexed are considered relevant and important by search engines and can help improve a website's visibility and rankings.These are pages that are important for users to find and that contain valuable content, such as your homepage, product pages, and blog posts, should be indexed.
Deindex: Refers to removing a page from search engine results. This can be done for various reasons, such as duplicate content, low-quality content, or to consolidate similar pages. These pages are usually thin, duplicate, or low-quality content, such as tag or category pages, should be deindexed.
Redirect: Refers to directing visitors from one URL to another. This can be useful for pages that have been removed or merged with another page, ensuring that visitors are directed to the most relevant content and search engines understand the change. An example is a product that is no longer available and should be redirected to a relevant page to preserve any existing search engine authority.
Canonicalize: Refers to consolidating similar or duplicate pages under a single canonical URL. This helps to avoid duplicate content issues and signals to search engines which page should be considered the primary source of information. Pages with duplicate content, such as printer-friendly versions of a page or similar product pages, should have a canonical tag applied to the preferred URL to avoid confusion for search engines and prevent any potential penalties.
- Once the classification is complete, filter the URLs by category.
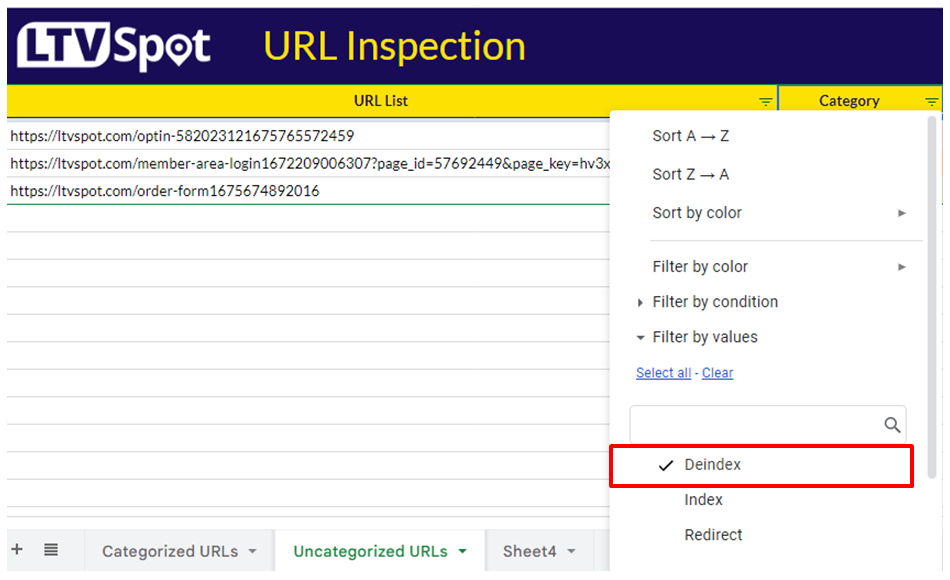
- Copy the filtered URLs and paste to the appropriate columns on the “Categorized URLs” sheet.
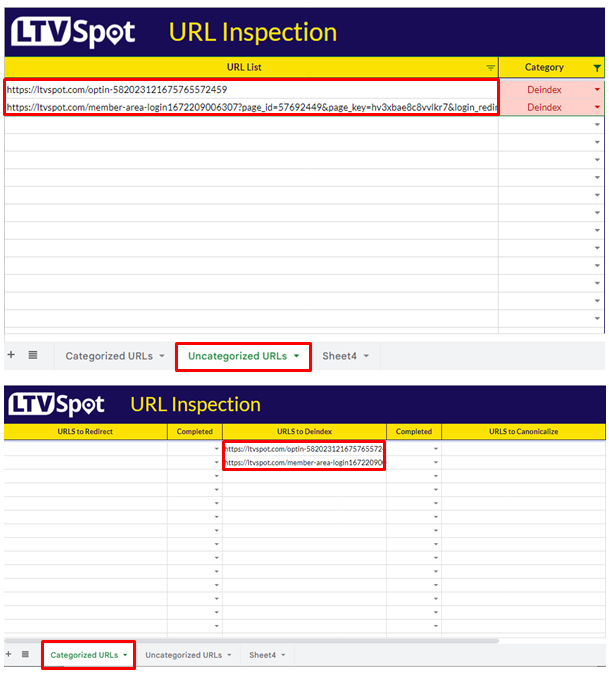
- Repeat the steps 5 to 6 until all the URLs are categorized.
Execute the appropriate actions
Depending on the classification, different actions need to be taken. By executing the appropriate action for each category, you can optimize your website's URL structure for better search engine performance.
URLs to Redirect:
-
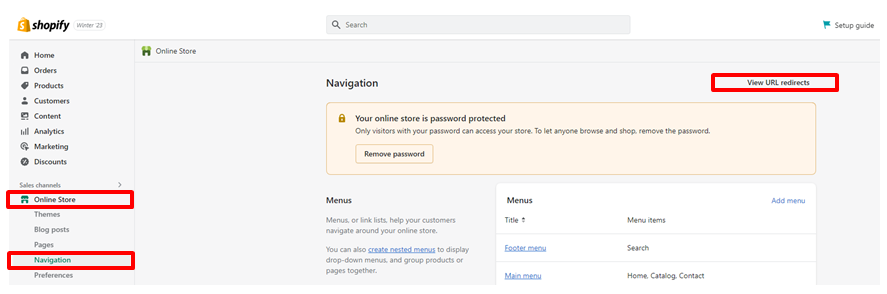
Log in to your Shopify account and go to the Online Store section.
-
Select Navigation and click on "URL Redirects".
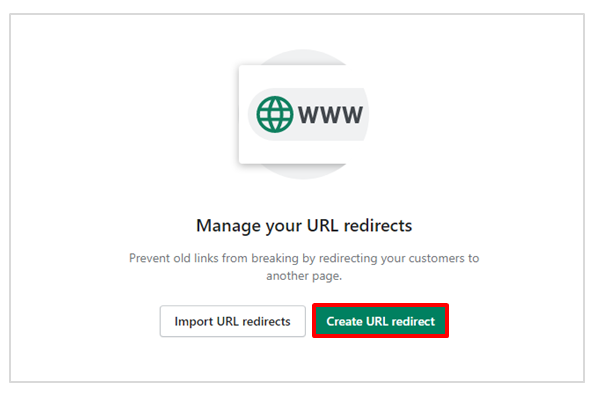
- Click "Create URL Redirect" to create a new redirect.
-
Enter the old URL in the "From" field. This is the URL that needs to be redirected.
-
Enter the new URL in the "To" field. This is the URL that the old URL will redirect to.
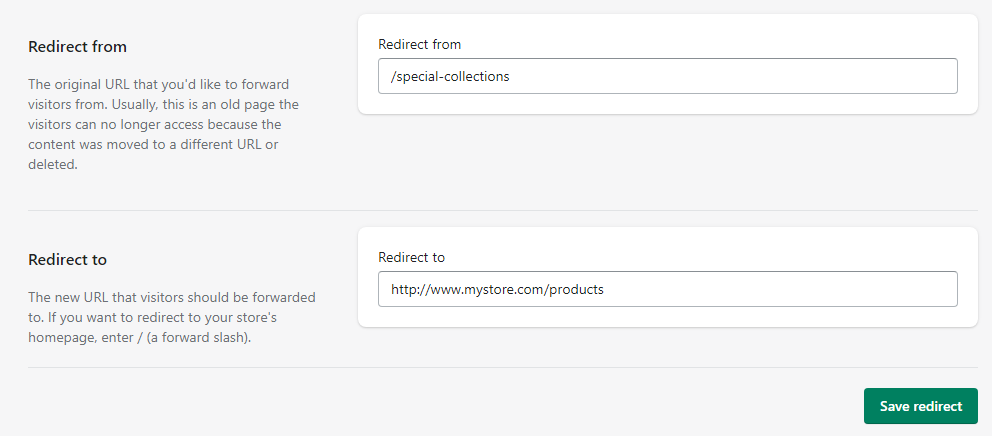
- After entering the new URL, select the "Save redirect" button located at the bottom of the window to complete the URL redirection process. To ensure that the redirect is working properly, follow these steps:
-
Open a new browser window and enter the old URL. You should be redirected automatically to the new page.
-
If the redirection does not occur, review your redirect settings to verify that the old URL matches exactly.
- Once the URL is successfully redirected, select “Yes” under the “Completed” column on the URL Auditing worksheet.
💡Tip: It is recommended to redirect to the most relevant page possible rather than just redirecting to the homepage. By properly redirecting URLs, you can ensure that your website visitors are directed to the correct pages and that search engines can properly crawl your site.
URLs to Deindex:
-
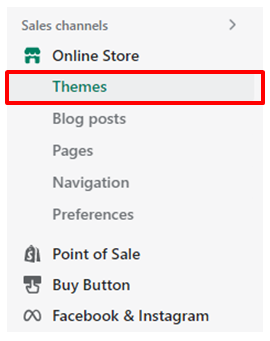
Log in to your Shopify account and go to the “Online Store”
-
Click on “Themes”
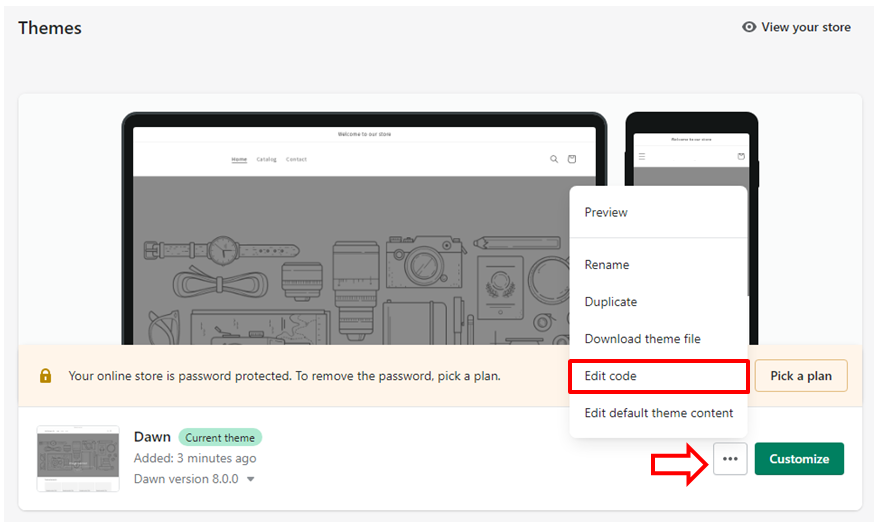
- On the themes section, click on the three ellipses at the bottom part and select “Edit code”.
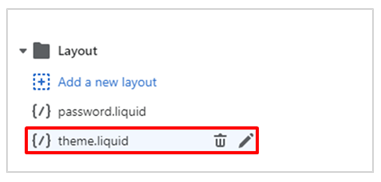
- Click the “theme.liquid” layout file.
- Paste the following code in the <head> section:
{% if handle contains 'page-handle-you-want-to-exclude' %}
<meta name="robots" content="noindex">
{% endif %}
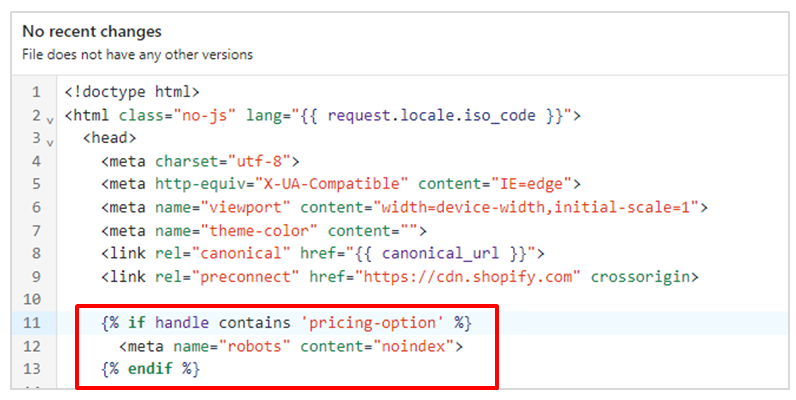
📝Note: Make sure that you replace page-handle-you-want-to-exclude with the correct page handle.
-
Click “Save”.
-
Once the URL is successfully deindexed, select “Yes” under the “Completed” column on the URL Auditing worksheet.
It may take some time for search engines to remove the deindexed URLs from their search results. Additionally, deindexing a URL will not remove it from your Shopify store - it will only prevent it from being indexed by search engines.
URLs to Canonicalize:
Shopify automatically generates canonical tags for each page on your website. By default, Shopify will use the page's URL as the canonical URL. The use of canonical tags is applicable to product pages in Shopify as well. Canonical tags can help to prevent duplicate content issues on product pages with similar content or multiple versions of the same product page. However, you can also use a third-party app or custom code to set your own canonical tags if needed.
Here is a step-by-step procedure on how to check if your Shopify website has canonical URLs on your product pages:
-
Open your Shopify store and navigate to the products section.
-
Click on any product to open its page.
-
Look at the URL in the address bar of your browser. If it contains any additional parameters, such as "?variant=123456789", then there is no canonical URL set for this product.
-
If the URL is clean and does not contain any additional parameters, check the source code of the page to ensure there is no canonical URL tag present.
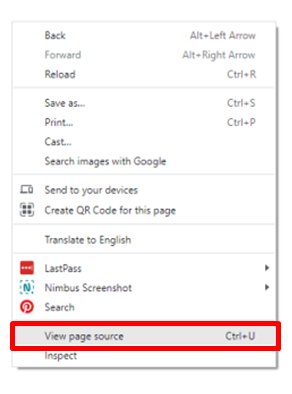
- To check the source code of your page, right-click on the page and select "View page source" from the menu. This will open the HTML source code for the page.
-
Look for the <head> section of the HTML code. You can find this by searching for "<head>" in the code.
-
Once you have located the <head> section, look for a line that starts with "<link rel="canonical". This line will indicate if a canonical URL has been set for the product page. If this line does not exist, it means that there is no canonical URL set for the product page.

-
Repeat steps 2-4 for each product in your store to ensure that all product pages have proper canonical URLs.
-
Once the URL is successfully canonicalized, select “Yes” under the “Completed” column on the URL Auditing worksheet.
Another best way to canonicalize URLs in Shopify is through redirecting. This ensures that the user is always directed to the correct URL and eliminates the possibility of duplicate content issues. It ensures that any links pointing to the duplicate URL will be redirected to your preferred URL, passing on any link juice to the your preferred page.
Follow the procedures on “URLs to Redirect” to apply redirects on the links under “Canonicalize’ column.
URLs to Index:
Shopify automatically indexes most URLs on your website, but there are a few things you can do to ensure that all the important pages are indexed:
-
Make sure that your page titles and descriptions are optimized for search engines by including relevant keywords and a clear description of the page content.
-
Ensure that all important pages have links pointing to them from other pages on your website.
-
Submit your sitemap to Google Search Console to help Google discover all the pages on your website. Refer to SOP 064 to learn how to submit your sitemap to Google Search Console.
-
Once the URL is confirmed to be indexed, select “Yes” under the “Completed” column on the URL Auditing worksheet.
Conclusion
You’re done! Remember, conducting a URL audit is a critical step in optimizing your website for search engines.By following this SOP, you can ensure that your website's URLs are properly organized and optimized for search engines, leading to improved search engine rankings and a better user experience for your visitors.
Execution Checklist:
-
Collect all URLs on your website using a tool or crawling software
-
Categorize each URL into one of the following categories: redirect, deindex, canonicalize, or index
-
Execute the appropriate actions for each category